

While you open a worksheet, Excel creates new rows and columns automatically. If you do not need to try this or forestall Excel from creating new rows and columns automatically, right here is how you are able to do that. You possibly can forestall or block Excel from creating infinite rows and columns automatically utilizing Excel Choices, Native Group Coverage Editor, and Registry Editor.
Stop Excel from creating new Rows and Columns automatically
To forestall Excel from creating new rows and columns automatically, comply with these steps:
- Open Microsoft Excel in your laptop.
- Click on on Choices.
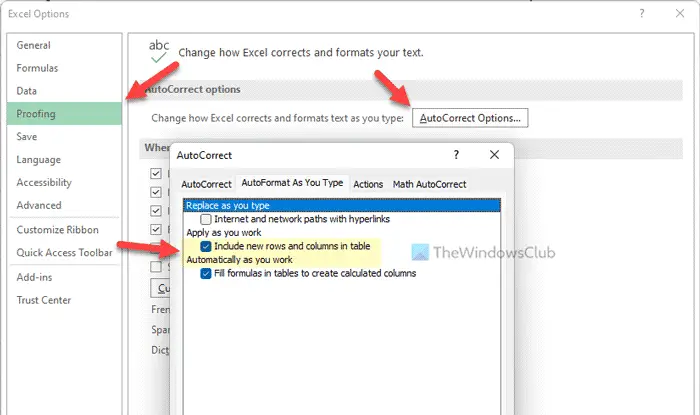
- Go to the Proofing tab.
- Click on on the AutoCorrect Choices.
- Change to the AutoFormat As You Sort tab.
- Take away the tick from the Embody new rows and columns in desk Automatically as you’re employed checkbox.
- Click on the OK button.
To be taught extra about these steps, proceed studying.
To start with, open Microsoft Excel in your laptop and click on on the Choices menu to open the Excel Choices panel. Then, change to the Proofing tab and click on on the AutoCorrect Choices button.
Following that, change to the AutoFormat As You Sort tab and take away the tick from the Embody new rows and columns in desk Automatically as you’re employed checkbox.
Lastly, click on the OK button to avoid wasting the change.
The way to cease Excel from creating new rows and columns automatically
To cease Excel from creating new rows and columns automatically, comply with these steps:
- Press Win+R to open the Run immediate.
- Sort gpedit.msc and hit the Enter button.
- Go to Proofing > Autocorrect Choices in Consumer Configuration.
- Double-click on the Embody new rows and columns in desk setting.
- Select the Disabled possibility.
- Click on the OK button.
Let’s try these steps intimately to be taught extra.
To get began, you want to open the Native Group Coverage Editor in your laptop. For that, press Win+R to open the Run immediate, sort gpedit.msc, and hit the Enter button.
Then, navigate to the next path:
Consumer Configuration >Administrative Templates > Microsoft Excel 2016 > Excel Choices > Proofing > Autocorrect Choices
Right here you will discover a setting named Embody new rows and columns in desk. You might want to double-click on this setting and select the Disabled possibility.


Lastly, click on the OK button to avoid wasting the change and restart Microsoft Excel to use the change.
In case you wish to choose the default setting, you want to open the setting within the Native Group Coverage Editor, and select the Not Configured possibility.
The way to forestall Excel from creating new rows and columns automatically utilizing Registry
To forestall Excel from creating new rows and columns automatically utilizing Registry, comply with these steps:
- Press Win+R to show the Run dialog.
- Sort regedit > press the OK button > click on on the Sure button.
- Go to Microsoftoffice16.0 in HKCU.
- Proper-click on 0 > New > Key and title it as excel.
- Proper-click on excel > New > Key and set the title as choices.
- Proper-click on choices > New > DWORD (32-bit) Worth.
- Name it autoexpandlistrange.
- Preserve the Worth knowledge as 0.
- Restart your laptop.
To know extra about these aforementioned steps, hold studying.
For getting began, you want to open the Registry Editor in your laptop. For that, press Win+R to show the Run dialog, sort regedit, press the OK button and click on on the Sure possibility within the UAC immediate.
Then, navigate to the next path:
HKEY_CURRENT_USERSoftwarePoliciesMicrosoftoffice16.0
Proper-click on 16.0 > New > Key and title it as excel.


Then, right-click on excel > New > Key and set the title as choices. Following that, you want to create a REG_DWORD worth. For that, right-click on the choices key, choose New > DWORD (32-bit) Worth and name it autoexpandlistrange.

By default, it comes with a Worth knowledge of 0, and you want that Valued knowledge to stop Excel from creating new rows and columns automatically.

Lastly, shut all home windows and restart your laptop to get the change.
Word: If you wish to revert to the unique setting, you may have two choices. First, you possibly can set the Worth knowledge as 1. Alternatively, you possibly can delete this REG_DWORD worth. For that, right-click on it, choose the Delete possibility and click on the Sure button. Lastly, restart your laptop to use the change.
Learn: The way to get real-time Foreign money Trade Charges in Excel sheet
How do I get Excel to cease creating new columns?
To get Excel to cease creating new columns and rows automatically, you should utilize the Excel Choices setting. For that, change to the Proofing part and click on on the AutoCorrect Choices button. Then, change to the AutoFormat As You Sort tab and take away the tick from the Embody new rows and columns in desk Automatically as you’re employed checkbox.
Learn: The way to modify the variety of Undo ranges in Excel
The way to delete infinite columns and rows in Excel?
In case you don’t want to show infinite columns and rows in Excel spreadsheet, you possibly can delete or disguise them utilizing these steps. First, end modifying your spreadsheet and make sure the final column and row. Then, click on on the primary empty column and press Ctrl+Shift+Proper arrow. Then, go to Format > Conceal & Unhide > Conceal Columns. Equally, you possibly can disguise or delete all of the empty rows however you want to select the Conceal Rows possibility and choose all of the rows by urgent Ctrl+Shift+Down arrow.
Learn: Forestall Phrase, Excel, PowerPoint from hyperlinking screenshots automatically.


![Outlook Quick Print not working [Fix]](https://windows.intelfindr.com/wp-content/uploads/2024/10/Outlook-Quick-Print-not-working-Fix-450x239.png "Outlook Quick Print not working [Fix]")
