

By default, Microsoft Word replaces the chosen textual content when you begin typing. Nevertheless, if you don’t need to try this and as a substitute, you need to block Word from removing chosen textual content when typing, right here is how you can try this. It’s attainable to allow or disable this setting utilizing Word Choices, Native Group Coverage Editor, and Registry Editor.
Let’s say that you have chosen a textual content and need to change it with new phrases. For that, you don’t have to press the Backspace or Delete button after deciding on the textual content as a way to take away it. As a substitute, you can begin typing, and the chosen textual content shall be changed mechanically. Nevertheless, if you don’t need to try this because of some cause, this information shall be helpful for you.
Stop Word from removing or deleting Selected Text as you type
You may make Microsoft Word cease deleting chosen textual content by altering the ‘Typing replaces selected text‘ setting. To allow or block Word from removing selected text when typing, follow these steps:
- Open Microsoft Word on your computer.
- Click on the Options menu.
- Switch to the Advanced tab.
- Tick the Typing replaces selected text checkbox to allow.
- Remove the tick to block.
- Click the OK button.
To learn more about these steps, continue reading.
To get started, you need to open Microsoft Word first and click on the Options menu visible in the bottom-left corner.
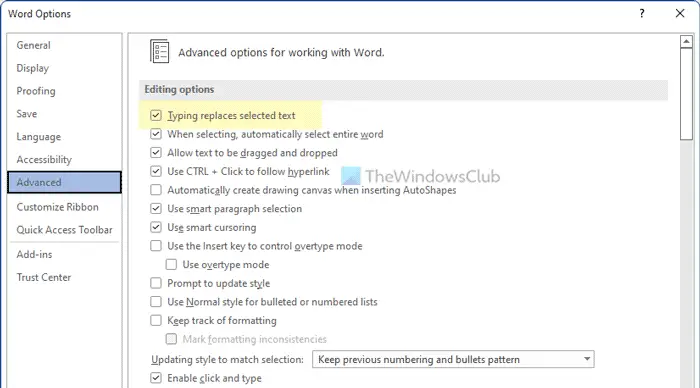
After opening the Word Options panel, you need to switch to the Advanced tab. Here you can find a setting called Typing replaces selected text.
If you want to allow removing the selected text, tick this checkbox. However, if you do not want to remove the selected text, remove the tick from the corresponding checkbox.
Finally, click the OK button to save the change.
How to enable or disable removing selected text when typing in Word
To enable or disable removing selected text when typing in Word, follow these steps:
- Press Win+R to open the Run prompt.
- Type gpedit.msc and press the OK button.
- Navigate to Advanced in User Configuration.
- Double-click on the Typing replaces selected text setting.
- Choose the Enabled option to allow.
- Choose the Disabled option to block.
- Click the OK button.
Let’s try these steps intimately.
First, you have to open the Native Group Coverage Editor. To do this, press Win+R > type gpedit.msc > press the OK button. Then, navigate to this path:
Person Configuration > Administrative Templates > Microsoft Word 2016 > Word Choices > Superior
Right here you can see a setting known as Typing replaces chosen textual content. You should double-click on it and choose the Enabled possibility to permit and the Disabled possibility to dam removing the chosen textual content whereas typing in Word.


Lastly, click on the OK button to save lots of the change.
Easy methods to allow or disable removing chosen textual content when typing in Word utilizing Registry
To allow or disable removing chosen textual content when typing in Word utilizing Registry, observe these steps:
- Seek for regedit and click on the search outcome.
- Click on the Sure button.
- Navigate to Microsoftoffice16.0 in HKCU.
- Proper-click on 0 > New > Key and identify it as phrase.
- Proper-click on phrase > New > Key and identify it as choices.
- Proper-click on choices > New > DWORD (32-bit) Worth.
- Identify it as autotextdelete.
- Double-click on it to set the Worth knowledge.
- Set it as 1 to permit and 0 to dam.
- Click on the OK button and restart PC.
Let’s delve into these steps intimately.
For getting began, seek for regedit within the Taskbar search field, click on on the person search outcome, and click on the Sure button within the UAC immediate to open the Registry Editor in your pc.
Then, go to this path:
HKEY_CURRENT_USERSoftwarePoliciesMicrosoftoffice16.0
Proper-click on 16.0 > New > Key and set the identify as phrase. Then, right-click on the phrase key, choose New > Key, and identify it as choices.


Following that, right-click on the choices key, choose New > DWORD (32-bit) Worth and identify it as autotextdelete.

By default, it comes with a Worth knowledge of 0. If you need to block this setting, preserve that Worth knowledge. Nevertheless, if you need to permit Word to take away the chosen textual content, double-click on it and set the Worth knowledge as 1.

Lastly, click on the OK button and restart your pc to get the change.
Learn: Easy methods to disable Text Drag and Drop function in Word and PowerPoint
How do you cease textual content from overwriting when typing?
To cease Word from overwriting when typing, you have to allow the Overtype mode. For that, open the Word Choices and go to the Superior tab. Then, discover the Use overtype mode setting and tick the corresponding checkbox.
Why is my textual content deleted after I type?
If Word is deleting textual content when you type, you have to disable the overtype mode. As stated earlier, you can discover this setting within the Word Choices panel. To show it on or off, open the Word Choices and go to the Superior tab. Then, uncheck the Use overtype mode possibility and click on the OK button.
That’s all! Hope this information helped.
Learn: Easy methods to cease Word from deciding on every little thing.


