

Need to push your Linux PC to the restrict? Need to see how properly it may possibly carry out beneath stress? Try GTKStressTest. It’s a straightforward to use GUI instrument that can allow you to stress your Linux PC with nearly no effort.
On this information, we’ll present you the way to set up the GTKStressTest program on your Linux PC, and the way to use it to carry out stress checks.
Notice: chances are you’ll expertise system errors and slow-downs when working the GTKStressTest instrument as it’s designed to push your {hardware} to the restrict.
Putting in GTKStressTest on Linux
Putting in GTKStressTest on Linux is feasible it doesn’t matter what distribution you utilize, and the builders do a great job of documenting the dependencies required to compile the software program. Additionally it is supported by way of Flatpak on Flathub, for these that don’t like constructing software program from supply.
To get the GTKStressTest app engaged on your Linux PC, open up a terminal window by urgent Ctrl + Alt + T or Ctrl + Shift + T on the keyboard. Then, observe the command-line set up directions that correspond with the OS you utilize.
Ubuntu
On Ubuntu, if you would like to get GTKStressTest working, you’ll want to compile the supply code from scratch. To begin, set up the dependencies required to construct on Ubuntu.
sudo apt set up appstream-util dmidecode gir1.2-gtksource-3.0 git libcairo2-dev libgirepository1.0-dev libglib2.0-dev meson python3-gi-cairo python3-pip stress-ng git
After putting in the entire required dependencies, use the git clone command to obtain the supply code to your system.
git clone --recurse-submodules -j4 https://gitlab.com/leinardi/gst.git
Transfer into the gst folder with the CD command.
cd gst
Use the pip3 command to set up the required Python3 necessities for constructing the software program.
pip3 set up -r necessities.txt
Use the meson command to set the construct prefix to “/usr.”
meson . construct --prefix /usr
Compile the code with the ninja construct command.
ninja -v -C construct
Lastly, set up this system with ninja construct set up
ninja -v -C construct set up
Debian
On Debian, it’s doable to construct the software program with the supply code, however the improvement web page doesn’t particularly reference the working system. In case you’d like to construct the code on Debian, observe the Ubuntu directions. In any other case, observe the Flatpak set up directions for a straightforward means to get GTKStressTest arrange on Debian.
Arch Linux
GTKStressTest is on the market as an AUR bundle on Arch Linux. To get it working, on your system, do the next.
First, obtain and set up the Trizen AUR helper instrument because it makes it simpler to get AUR packages constructed with out coping with dependencies manually.
sudo pacman -S git base-devel

git clone

cd trizen

makepkg -sri
With the Trizen instrument arrange, use it to set up the GTKStressTest app.
trizen -S gst
Fedora
On Fedora, it’s doable to construct the code from supply. Nonetheless, on Fedora Linux, Flatpak is deeply built-in into the system. For that reason, we propose Fedora customers make use of the Flatpak directions beneath.
Flatpak
Flatpak is an effective way to set up GTKStressTest, because it requires no source-code compilation. To get the app engaged on your system with Flatpak, make sure the runtime is ready up on your Linux PC. Then, enter the instructions beneath.
flatpak --user remote-add --if-not-exists flathub

flatpak --user set up flathub com.leinardi.gst
Utilizing GTKStressTest to stress test your Linux PC
Stress testing with GTKStressTest is sort of easy, thanks to its considerate, properly laid out UI. To begin the stress testing course of, open up the app on your Linux desktop by trying to find it within the app menu. Then, observe the step-by-step directions beneath.
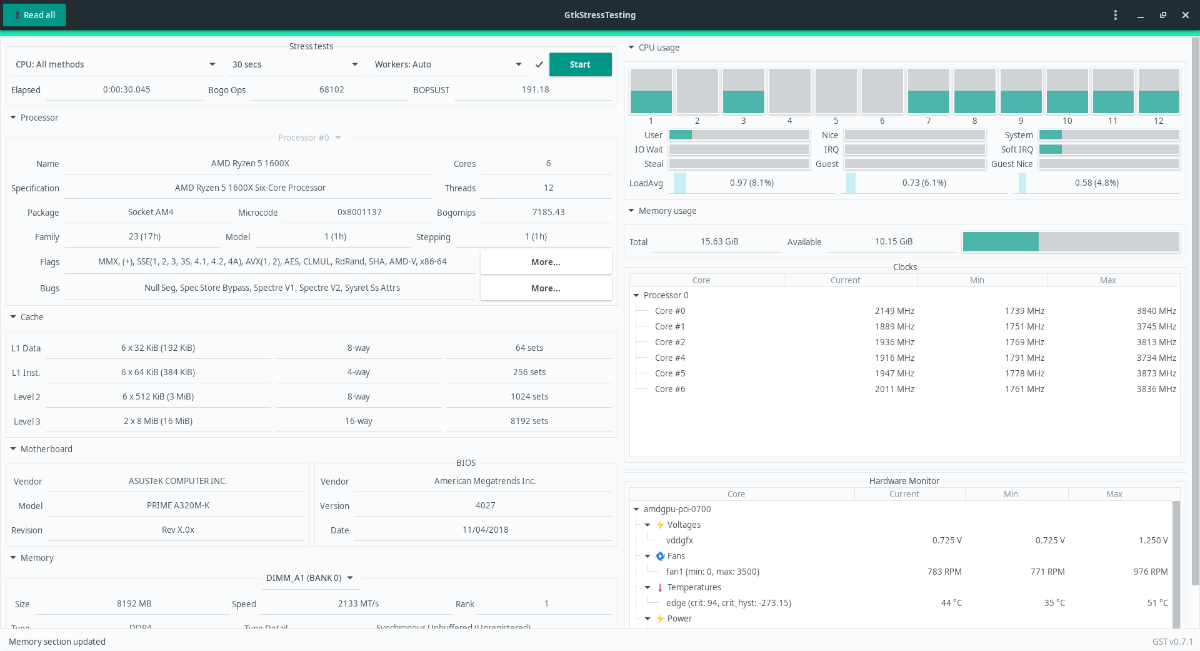
Step 1: As soon as GTKStressTest app is open, search for the “Read all” button on the prime left part of the window and click on on it. This button, when clicked, will permit GTKStressTest to view system data that’s solely obtainable with the foundation person.


Step 2: Find the drop-down menu with “CPU: All methods” written on it. Click on on the drop-down menu and select the very best kind of stress test to use on your CPU.
In case you’re not sure about what kind to select, depart it at “All methods.” This selection will undergo all types of stress checks for the CPU.
Step 3: Find the drop-down menu with “30 mins” on it, and click on on it. Then, change “30 mins” to the specified time you need to stress test for. Or, depart it at half-hour.
Step 4: Discover the “Start” button to begin stress-testing the CPU on your Linux PC.


Once you press the “Start” button, GTKStressTest will start rigorously testing your Linux system for the time you chose. Sit again, watch the graphs, and wait.


When GTKStressTest is finished testing your Linux PC, you will notice a notification that the test is full.


