

Tables are used to manage information, however do you know which you could insert Images into your Word desk? By default, a cell in the desk will regulate to the scale of an inserted image, so you’ll be able to insert as many photos into your desk as you need. On this tutorial, we’ll clarify how to insert photos into a desk in Microsoft Word.
How to insert Images into Table in Microsoft Word
Need to match a picture in a Table cell in Word? Observe the steps beneath to insert photos into a desk in Microsoft Word:
- Launch Microsoft Word.
- Click on the Orientation button in the Web page Setup group and choose Panorama.
- Click on the Margin button and alter the margins to Slender.
- Insert a desk into the doc.
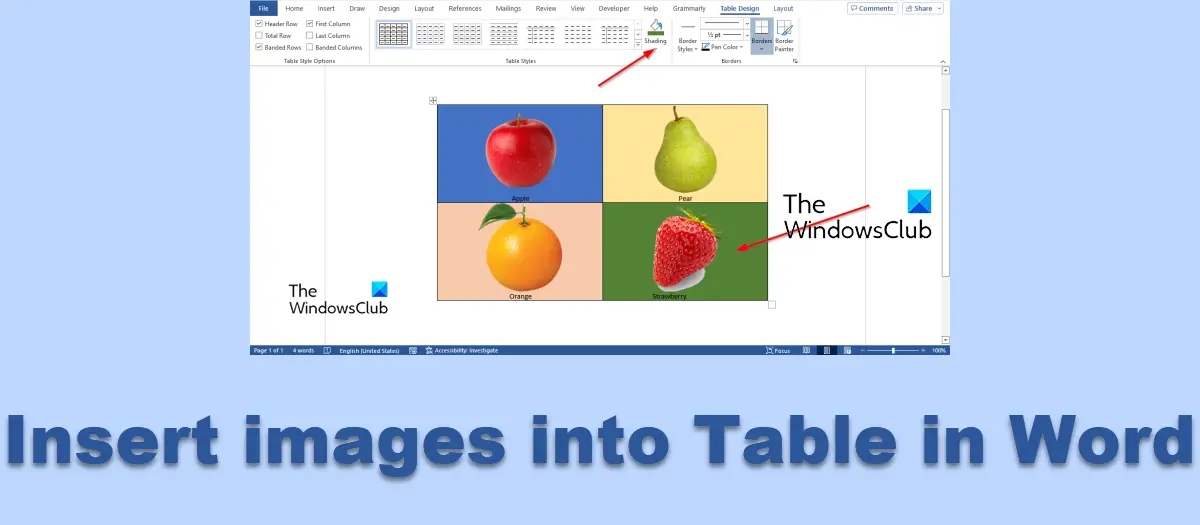
- Click on the double arrow to choose all of the tables.
- Change the peak and width of the desk.
- Then click on the Align backside heart button.
- Click on the AutoFit button and choose Mounted Column Width.
- Now insert photos into every desk cell.
- Click on on the image, then click on the Image Format tab.
- Change all the image’s heights to 1.8.
- Click on the Table Design tab, choose the Shading button and select a coloration.
Launch Microsoft Word.
Earlier than you insert a desk into the Word doc, click on the Structure tab, click on the Orientation button in the Web page Setup group, and choose Panorama.


Then click on the Margin button and alter the margins to Slender.
Now Insert a desk into the Word doc.
You’ll be able to enter information into the desk if desired.


Click on the double arrow to choose all of the tables.
Now change the peak and width of the desk in the Cell dimension group. On this tutorial, we have now to change the Top to 2” and the Width to 3.5”.
Then click on the Align backside heart button in the Alignment group.


On the Structure tab, click on the AutoFit button in the Cell Dimension group and choose the Mounted Column Width choice from the menu.
Now insert photos into every desk cell.
You’ll discover that the images are too large for the desk, so they won’t maintain onto one doc. To repair this situation.

Click on on the image, then click on the Image Format tab.
Change the peak of the image to 1.8. Change all the images in the desk to that peak.
You too can change the cell of the desk by clicking on a cell, then clicking the Table Design tab.

Then click on the Shading button and select a coloration.
Now we have now efficiently inserted photos into a desk.
How do I insert a number of Footage into a desk in Word?
If a person desires to choose a number of photos in Microsoft Word, observe the steps beneath.
- Click on on the primary image to choose it
- Press and maintain the Ctrl button in your keyboard.
- Click on on the remainder of the images.
READ: How to convert Table to Image in Word
Are you able to insert Footage into a desk in Word?
Sure, you’ll be able to insert an image in a desk in Microsoft Word, however you should know the method in order that the image you could have inserted into the cell won’t be unorganized. On this tutorial, we have now defined how to insert photos into a desk in Microsoft Word.
READ: How to insert a Image into a Form in Microsoft Word
We hope you perceive how to insert photos into a desk in Microsoft Word.


