

The proprietary Nvidia driver is crucial to Ubuntu customers trying to play video video games. Nevertheless, in case you are a gamer, there isn’t a want to have this driver put in, because the open-source one works simply wonderful.
Uninstalling the Nvidia driver on Ubuntu is hard, particularly for these new to Ubuntu. So, please comply with together with this information to learn the way to uninstall the Nvidia driver.
Observe: on this information, we assume you might be utilizing Ubuntu’s Gnome desktop surroundings. In case you use Xubuntu, Kubuntu, or one other Ubuntu spin, you’ll nonetheless give you the option to comply with together with the directions, however among the steps might change.
Disable Nvidia drivers GUI
Disabling your Nvidia drivers on Ubuntu is best performed with the built-in GUI. The rationale? The motive force GUI in Ubuntu is sort of polished, has a easy UI, and even your grandmother might determine it out. In case you’re making an attempt to work out how to uninstall the Nvidia drivers so you’ll be able to return to the open-source ones, comply with the step-by-step directions beneath.
Step 1: Press the Win (home windows key) on your keyboard. By urgent this key, you’ll carry up Ubuntu’s desktop search space. Within the desktop search space, sort out the search time period “Software & Updates.” As you sort, it ought to present up within the search outcomes.
Step 2: Click on on the “Software & Updates” icon within the search outcomes to open up Ubuntu’s Software program & Updates app.
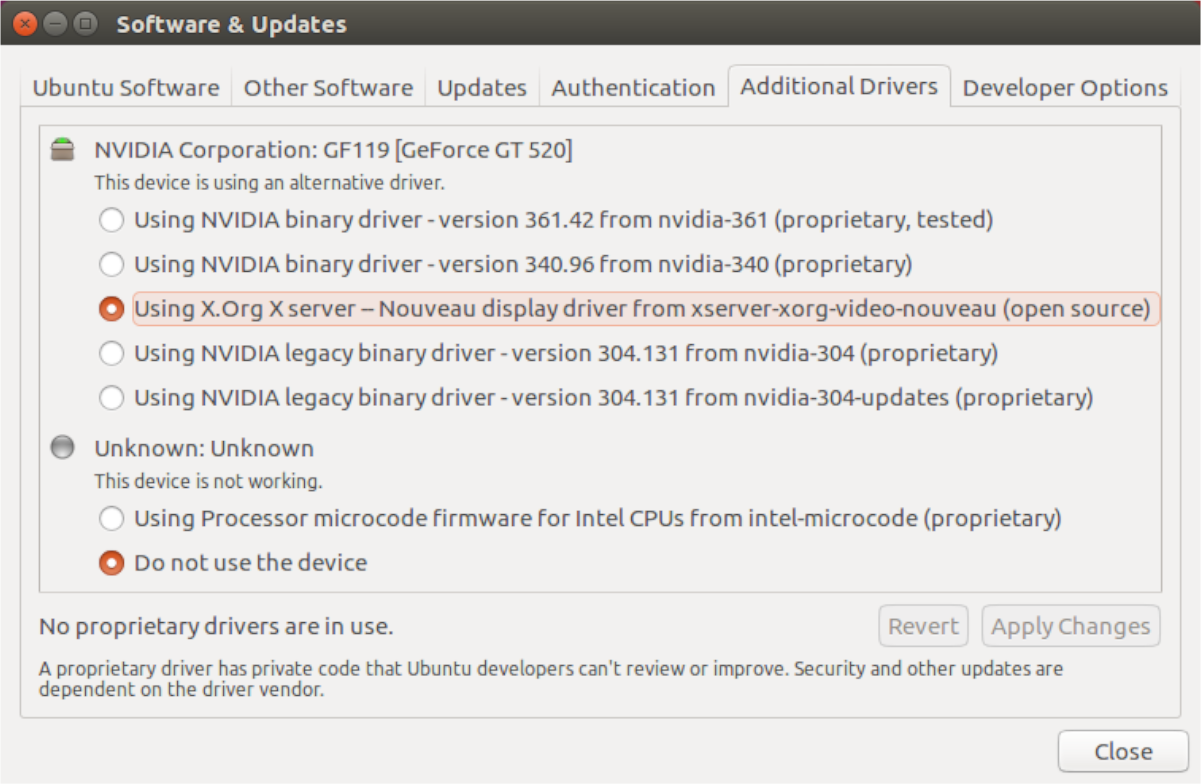
Step 3: Within the “Software & Updates” app, you will notice a number of totally different tabs obtainable to click on on. These tabs are “Ubuntu Software,” “Other Software,” “Updates,” “Authentication,” “Additional Drivers,” and “Developer Options.” Choose the “Additional Drivers” tab with the mouse to entry your Ubuntu PC’s proprietary drivers panel.
Step 4: Within the “Additional Drivers” tab, it’s best to see the entire units on your Ubuntu PC that require third-party drivers.
Look by way of the record of units for one that claims “NVIDIA Corporation.” The “NVIDIA Corporation” one is your graphics card.
Step 5: Choose the field subsequent to “Using X.Org x server – Noveau display driver.” This selection is the open-source Nvidia driver.


By choosing this selection, your graphics card will de-select the Nvidia graphics driver choice and begin to set up/reinstall the open-source driver as a replacement. Throughout this course of, it’s important to be affected person. Switching graphics drivers can take a little bit of time. Don’t shut off your pc or shut the Software program & Updates window!
Step 6: When your Nvidia driver is finished uninstalling by way of Software program & Updates, you will notice a message within the window that claims, “No proprietary drivers are in use.”
With the proprietary Nvidia driver efficiently eliminated, find the “Close” button within the backside proper portion of the window and click on on it with the mouse to shut the Software program & Updates app.
Step 7: As soon as the Software program & Updates app is closed, the method of eradicating the Nvidia driver out of your Ubuntu PC is taken care of. Now you have to reboot your PC.
To reboot, discover the ability off button, and choose it with the mouse. Then, click on the “Restart” choice. Or, launch a terminal window and run the sudo reboot command.
Upon logging again in from the reboot, you’ll now not be utilizing the Nvidia driver on your system!
Uninstalling Nvidia drivers command-line
People who desire to use the command-line in Ubuntu will probably be blissful to know that it’s potential to uninstall the entire Nvidia drivers from the system within the Linux terminal. To start out the uninstallation course of, launch a terminal by urgent Ctrl + Alt + T or Ctrl + Shift + T on the keyboard. Then, comply with the step-by-step directions outlined beneath.
Step 1: Earlier than trying to uninstall the Nvidia driver, it’s best to verify that you just certainly have it put in within the first place.
To find out you probably have the Nvidia drivers put in on your system, make use of the dpkg -l command. It’ll record all put in Nvidia packages on Ubuntu.
dpkg -l | grep -i nvidia
Assuming Nvidia packages present up within the command output, you may have Nvidia drivers put in on Ubuntu and can go ahead with uninstallation. If not, discontinue this information.
Step 2: Eliminating the Nvidia drivers on Ubuntu requires making use of the purge flag. This flag will uninstall the Nvidia drivers from the system, however it would additionally erase all configuration information as properly.
sudo apt remove --purge '^nvidia-.*'
Step 3: As soon as the Nvidia drivers are purged from the system, you’ll need to reinstall the Ubuntu-desktop bundle, as it would have been uninstalled throughout step 2.


sudo apt set up ubuntu-desktop
Step 4: By uninstalling the Nvidia driver from Ubuntu, you could discover the open-source driver blacklisted. To repair this subject, make use of the next echo command.
echo 'nouveau' | sudo tee -a /and so forth/modules
Step 5: Lastly, you have to remove the Xorg configuration file because it has Nvidia driver settings in it. To remove it, run the rm command.
sudo rm /and so forth/X11/xorg.conf
As soon as the Xorg configuration file is eliminated, reboot your Ubuntu PC. Upon logging again in, the Nvidia driver is eliminated.


