

Out of all of the desktop environments on Linux, Gnome Shell is the one with essentially the most potential for mimicking Apple’s Mac OS (as a result of its related design). With regards to themes, the macOS High Sierra pack is the most effective one to show Gnome Shell into macOS High Sierra.
Set up Gnome Extensions Instrument
Earlier than enabling any themes, you’ll must do a number of issues. Particularly, you’ll want to put in the Gnome extensions browser integration instrument and the customized themes extension. Along with all of this, you’ll want to put in a appropriate, Mac-like icon theme.
Set up Packages
When the Gnome extensions browser instrument and icon theme have been taken care of, end up preparations by putting in packages wanted to show Gnome Shell into macOS High Sierra.
Ubuntu
sudo apt set up git plank
Debian
sudo apt-get set up git plank
Arch Linux
sudo pacman -S git plank
Fedora
sudo dnf set up -y git plank
OpenSUSE
sudo zypper in git plank
Different Linuxes
Plank and Git are pretty widespread applications on most Linux distributions, so there needs to be no concern putting in them, even on essentially the most obscure distribution. To set up it, open up your bundle supervisor, search and set up each “git”, and “plank”.
Set up macOS High Sierra Theme
The Mac OS High Sierra theme for Linux has quite a lot of help for various working methods. On this information, we’re specializing in Gnome as a result of it’s similarity to the Mac working system.
Getting this theme working begins out by downloading the supply code from Github. To obtain, open up a terminal window and use the git command.
git clone
With the theme information downloaded to the Gnome desktop, some settings should be modified. Particularly, the customized themes choice. To allow, open up the Gnome sprint, seek for “Tweaks” and launch it. Within the “Tweaks” app, click on on the “Extensions” part.
The “Extensions” window homes dozens of various issues to allow. For this information, the one factor that issues is the “user themes” extension. Click on “user themes” to show it on.


Then, utilizing the CD command, transfer the terminal from /dwelling/ into the brand new macOS-High-Sierra folder.
cd macOS-High-Sierra
Utilizing the mv command, place Wallpaper.jpg into the ~/Photos folder.
mv Wallpaper.jpg ~/Photos
Lastly, set up the remainder of the theme to the system.
sudo mkdir -p /usr/share/themes/macos-sierra
mv * /usr/share/themes/macos-sierra
Alternatively, set up the High Sierra theme for a single consumer, by doing the next:
mkdir -p ~/.themes

mkdir -p ~/.themes/macos-sierra

mv * ~/.themes
The macOS High Sierra theme is able to use. Now all that’s left is to allow it. To allow it, open up Tweaks and choose “Appearance”.
Below the “Applications” drop-down menu, choose macos-sierra to set the GTK theme. Do the identical for “Shell theme”.
Window Controls
An non-obligatory step within the set up course of is to alter the placement of the window controls from the proper to the left (like on a Mac). This step isn’t necessary, and skippable should you dislike having controls on the left. Nevertheless, setting the window controls this fashion goes a good distance in making Gnome really feel extra Mac-like.
To change the route of the window controls, open up a terminal and run the next command:
gsettings set org.gnome.desktop.wm.preferences button-layout shut,decrease,maximize:
Disable Gnome Dock
Gnome Shell has a built-in Dock nevertheless it’s not very helpful for this theme so it must be disabled. One of the best ways, presently, to utterly disguise the built-in app dock within the Gnome desktop is to put in the “Dash to Dock” extension, and switch all of the settings off to completely disguise it.
Obtain and set up the extension, then, open up “Tweaks”. Go to “Extensions,” and click on the slider to allow “Dash to dock”. As soon as enabled, click on the gear to entry its settings.


Undergo the sprint to dock settings space and disable each choice. Each slider within the choices menu needs to be at 0, and each attainable choice needs to be turned off. If performed accurately, the Gnome dock will no be longer seen.


With the Gnome dock disabled, there isn’t a method to click on the “view applications” button. As a substitute, to entry the “all applications” space, press Win + A.
Allow Plank
The final huge step within the transformation course of for Gnome Shell is to allow a correct Mac dock. On this case, we’ll use Plank. It’s a a lot better-looking dock for this use-case. To flip it on, click on the Apple icon within the top-left, seek for “Plank” and click on on it.
As soon as the dock is open, it’ll present up on the backside of the display screen. Proper-click on the dock, and choose the “preferences” choice.
“Preferences” is an space of the Plank dock the place customers can customise it. On this information, solely slightly customization is important. Particularly, a setting wants tweaking in order that Plank matches the MacOS Sierra theme.
To change the theme, look within the Preferences space for the “theme” drop-down menu and alter it to “GTK+”.
Lastly, end up the method by making a startup entry for Plank in a terminal.
mkdir -p ~/.config/autostart

cp /usr/share/purposes/plank.desktop ~/.config/autostart
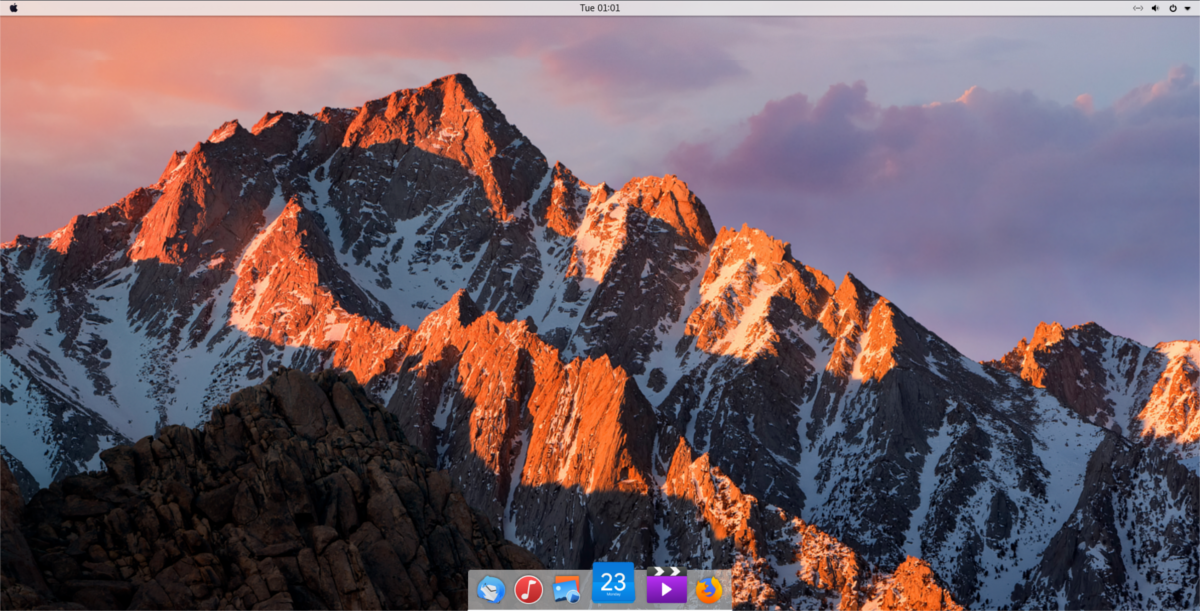
With the Plank dock and theme settings arrange accurately, your new Mac-like Linux desktop is able to use!


