

Within the terminal, many customers persist with Bash. Consequently, their terminal expertise isn’t nearly as good because it may very well be. It’s very primary, with no trendy options out of the field. In order for you a greater terminal expertise, think about switching from Bash to Fish Shell.

Set up Fish Shell
Earlier than switching from Bash to Fish Shell as your main terminal Shell, you’ll want to put in it on Linux. Fortunately, its extremely popular and there are packages of it on just about each Linux distribution on the market. Open up a terminal and enter the command beneath to put in it.
Ubuntu
sudo apt set up fish
Debian
sudo apt-get set up fish
Arch Linux
sudo pacman -S fish
Fedora
sudo dnf set up fish
OpenSUSE
sudo zypper set up fish
Different Linuxes
Fish has been round for some time, regardless of being pretty trendy in options. Resulting from its age, it’s fairly simple to get it on nearly any Linux distribution. To set up it, open up a terminal and verify your bundle supervisor for “fish” or “fish shell”. Alternatively, try the official Github page and construct it from supply with this system code.
Switch Bash To Fish Shell
Utilizing Fish as the first shell might take some getting used to, as it is extremely completely different from Bash. In contrast to a number of different options (like Zsh, Ksh, and so forth), Fish isn’t utilizing the Bash system as a base. Since Fish has this design, some instructions might flat out refuse to work on account of a distinct syntax, and also you’ll probably have to alter some habits when utilizing the terminal.


Fortunate for you, there’s an awesome web page that outlines all the intricacies of the Fish Shell and surroundings to look over. It outlines the Fish Syntax, the way it handles piping, and so many different issues. When you’re contemplating making the change, do your self a favor and provides it a learn.
When you’ve appeared the cheatsheet over, it’s secure to open up a terminal and alter your consumer’s default shell from Bash to Fish Shell. Within the terminal, run the chsh command. Nevertheless, don’t run it with sudo, or you might doubtlessly swap the Root consumer’s shell to Fish as a substitute of your individual.
chsh -s /usr/bin/fish
Operating the chsh command will assign your consumer the brand new shell. To achieve prompt entry to Fish along with your consumer, write fish into the terminal. In any other case, restart your Linux PC to finalize the change. After rebooting, log again in and open up a terminal once more. If every thing goes proper, Fish would be the new default, and also you’ll be greeted with the Fish Shell, quite than Bash.
Configuring Fish
Although you’ve switched to the Fish Shell, it’s not totally prepared to make use of. The subsequent step is to configure it. Within the terminal, create a brand new configuration folder.
mkdir -p ~/.config/fish
Subsequent, create a brand new configuration file, within the brand new Fish config folder:
contact ~/.config/fish/config.fish
Utilizing contact creates a clean Fish Shell config file with nothing in it. At this level, it’s secure so as to add any customized configurations into the shell. For many customers, the one modification wanted is one to completely disable the welcome message. Add the modification to the Fish config by operating the next command:
echo 'set fish_greeting ""' >> ~/.config/fish/config.fish
Backup Fish Config
Organising Fish on a number of computer systems may be fairly annoying, as you’ll must create a brand new config for every PC. A faster method is to create a backup of the file and restore it on every PC you intend to make use of Fish on. To again up the config, run this command within the terminal
cp ~/.config/fish/config.fish ~/Paperwork/
To restore the config, transfer the file to the brand new PC, place it within the Paperwork folder and run:
mkdir -p ~/.config/fish

cp ~/Paperwork/config.fish ~/.config/fish/config.fish
Customization


For essentially the most half, Fish is all arrange and able to use. Nevertheless, if you wish to customise and configure it additional, there’s a method to do this. Go into the terminal and run this command:
fish_config
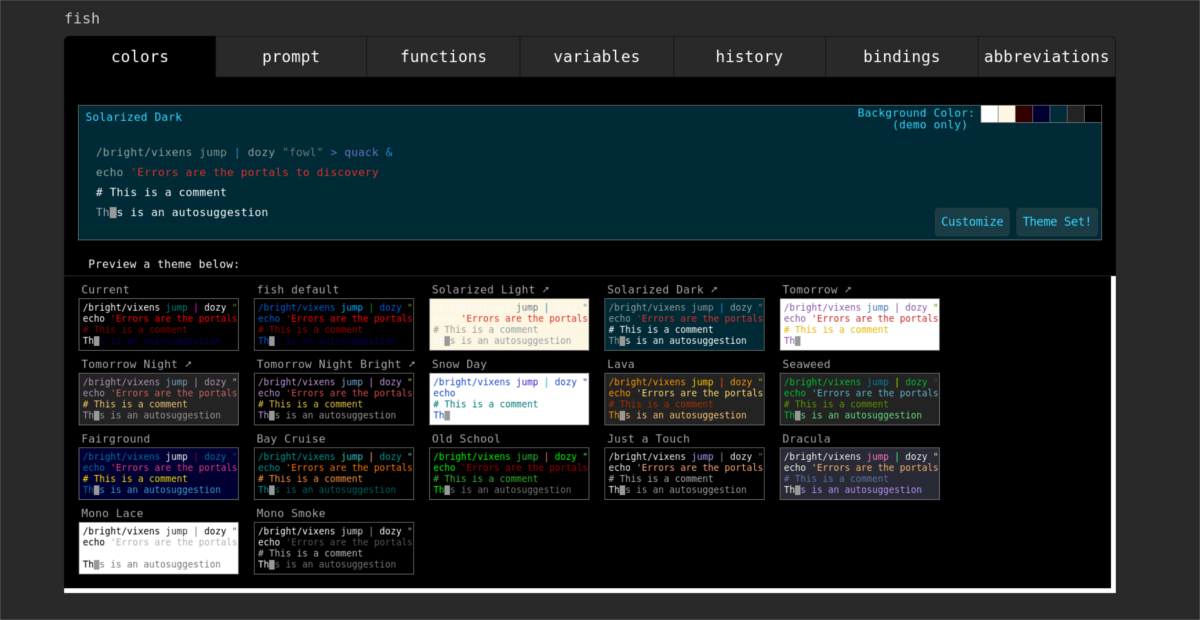
Operating this command will routinely open up a brand new tab in your net browser, with it’s doable features of Fish.
Within the Fish_Config window, you’ll be capable to apply preset shell themes, assign variables, set customized capabilities, view command historical past, assign abbreviations, aliases and extra!
Fish Autocomplete
By far, essentially the most engaging function in Fish is the autocomplete function. It’s up to now forward of every thing else, and this one function alone is sufficient to persuade even essentially the most diehard of Bash followers to test it out. One of the best half about this function is that it doesn’t require a number of know-how to benefit from. Even terminal noobs can get a number of use out of it.
To use the Fish autocomplete function, go to the terminal and begin typing a command. As you kind, you’ll see the shell attempt to guess as you go. It corrects because it receives extra info. At any time you may auto-complete a command by urgent the proper arrow key on the keyboard. After urgent the right key, your half-finish command will likely be routinely accomplished.


