

Want to share a folder in your Ubuntu PC to another person on the network? Uncertain about how to accomplish this activity, as you’re new to Ubuntu? We may help! Comply with alongside as we present you ways to use considered one of Ubuntu’s greatest options: folder sharing.

Please observe that on this information, we will likely be overlaying Ubuntu’s default desktop surroundings: Gnome. In case you are utilizing Kubuntu, Xubuntu, or every other taste, these directions is not going to work.
Sharing folders with the file supervisor
Sharing a folder over the network on Ubuntu Linux is completed inside the file supervisor. So, earlier than trying to do something, you need to first open up the Ubuntu file supervisor. To try this, press Win on the keyboard. Urgent Win will convey up the search field.
Word: Ubuntu requires a network connection for sharing with the network. Guarantee you’ve your Ubuntu desktop or laptop computer pc linked to the router, interacting with different computer systems on the network. And not using a network connection, different computer systems won’t be able to see or work together with the network shares you create on Ubuntu.
Inside the search field, kind out “Files.” After typing out “File” in the search field, you’ll begin to see search outcomes seem. Click on on the search end result that has the label “Files” to open up the Ubuntu file supervisor.
As soon as the Ubuntu file supervisor is open up in your Linux PC, comply with the step-by-step directions outlined under to find out how to share information with the Ubuntu file supervisor.
Step 1: Look by way of your private home listing in your Ubuntu PC. This listing holds all information and folders in your person account for this Ubuntu set up. All the pieces you’ll need to share is on this listing.
Step 2: When you’ve discovered a folder you desire to to share over the network with Ubuntu, right-click on it with the mouse to convey up the right-click menu.
Step 3: Inside the right-click menu, there are various choices accessible. Look by way of all of the totally different menu choices for the “Local Network Share” one. Then, choose it with the mouse.
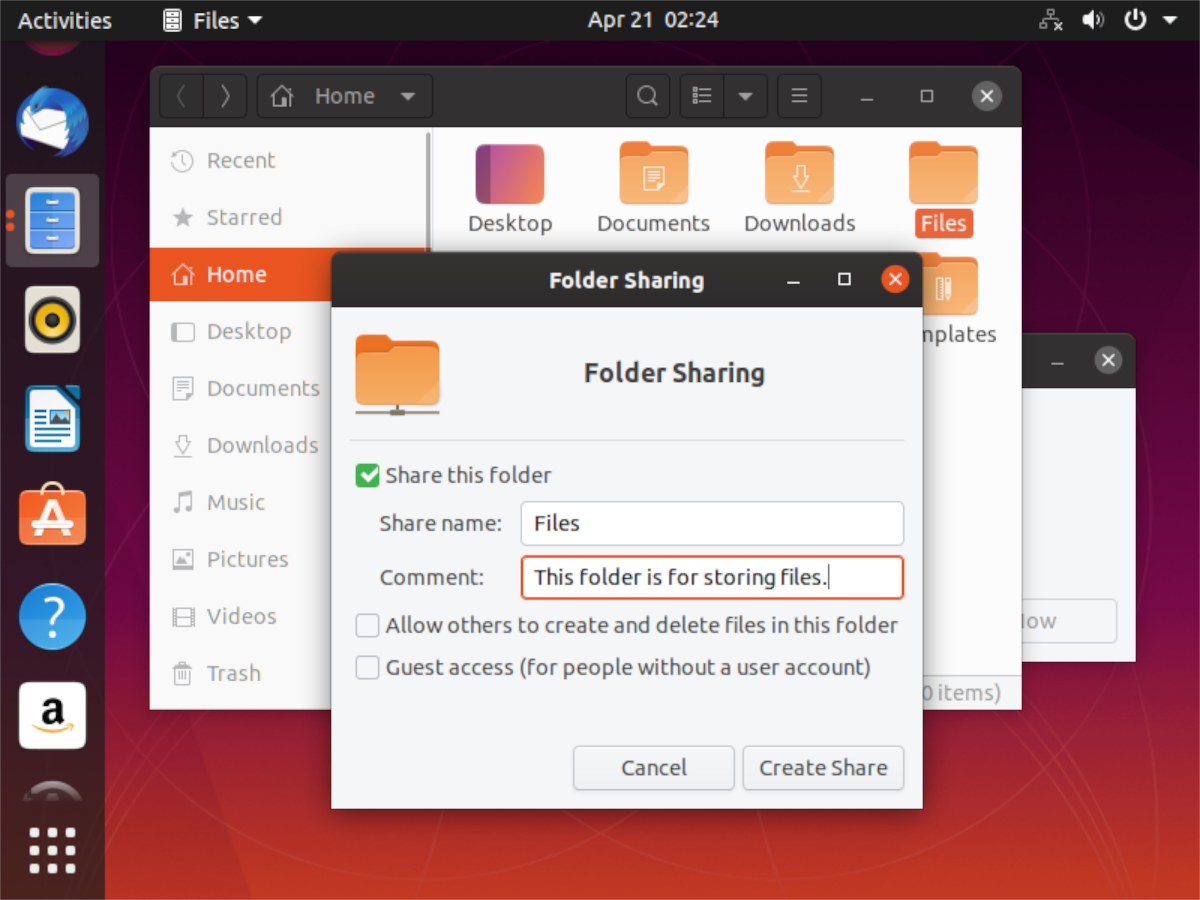
Step 4: Upon clicking on the “Local Network Share” button, the Ubuntu file supervisor will convey up a brand new window. This new window is the “Folder Sharing” window, and also you’ll want to configure it to share the folder you’ve chosen with different customers on the native network.
In the “Local Network Sharing” window, verify the field subsequent to “Share this folder.” By checking this field, you’ll inform Ubuntu that you really want to allow the sharing characteristic for this folder.


Step 5: After deciding on the “Share this folder” button, you will note a immediate seem. This immediate says, “Sharing service is not installed. You need to install the Windows networks sharing service in order to share your folders.”

Discover the “Install service” button, and click on on it with the mouse to set up the service to your Ubuntu PC. Be certain to enter the password related together with your person account throughout the set up course of.
Step 6: When you’ve chosen the “Install service” button, Ubuntu will ask you if you would like to “Install additional software”. Choose the “Install” button together with your mouse to inform Ubuntu to exit and obtain the required information to allow sharing in your PC.
Step 7: After deciding on the “Install” button, Ubuntu will exit and obtain every little thing required to share folders utilizing the file supervisor in your system. Needless to say this obtain could take a few minutes, particularly when you’ve got an web connection that isn’t very speedy.
Step 8: When Ubuntu finishes putting in the instruments requires to share folders, you can be returned again to the “Folder Sharing” window. From right here, find the “Share name” textual content field and alter the default identify that the sharing window has to one thing extra identifiable!
For instance, if you’re sharing paperwork, it would make sense to make the share’s identify “document share”. Or, if it’s a music share, take into account “songs” or “albums.” Be artistic! Particularly should you’re sharing a folder with somebody who doesn’t perceive computer systems very nicely!
Step 9: After altering the identify of your share, find the “Comment” textual content field. On this space, describe what you might be sharing. By including remark in the “Comment” part, different customers will know precisely what’s in the share if the share identify alone doesn’t inform them.

Step 10: Test the field subsequent to “Allow others to create and delete files in this folder” if you want to make it doable for others on the network to create/delete information. If you would like the share to be read-only, don’t verify the field.

Step 11: Test the field subsequent to “Guest access.” Choosing this feature will permit anybody to simply entry the share even when they don’t have a person account arrange in your Ubuntu system. This feature prevents many complications!
Step 12: Lastly, find the “Create Share” button, and click on on it with the mouse to create your new share.

Upon clicking on the “Create Share” button, you may even see a message that claims, “Nautilus needs to add some permissions to your folder. If this message appears, select the “Add the permissions automatically” button to proceed.

As soon as every little thing is about up, your network share will likely be seen to others on the network through Home windows, and different working techniques offered they’ve help for Samba.


