

Outlook is an email shopper from Microsoft that’s used to ship and obtain email messages. Microsoft Outlook comes with a function that lets customers set the precedence of email messages earlier than sending an email. This function is helpful in case you need to draw the consideration of your receivers in order that they may reply to your message as shortly as potential. On this article, we’ll see how to set precedence for an email in Outlook.
How to set precedence for an email in Outlook
We are going to clarify the process to set precedence for an email in:
- Outlook desktop app.
- Outlook on the Internet.
Let’s begin.
1] How to set precedence for an email in Outlook desktop app
The steps that we are going to clarify listed below are for Outlook 2016. The steps might differ for different variations of the Outlook desktop app due to totally different interfaces.


- Launch Microsoft Outlook desktop app.
- Just remember to have chosen the House tab.
- Click on on the New email button. This may open a brand new window in Outlook to ship an email.
- Fill in the receiver’s email handle and kind your message.
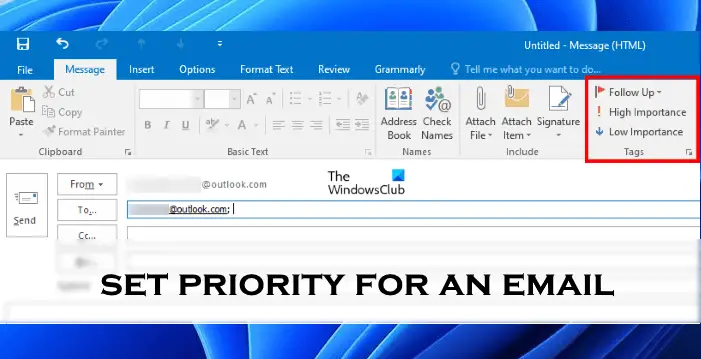
- Set the precedence of the email message as High significance or Low significance. You can find these choices beneath the Tags part.
By default, all the email messages are set to regular precedence. The excessive precedence email messages are marked with a pink exclamation mark and the low precedence messages are marked with a blue down arrow. When the receiver receives an email, he’ll see these marks on the email. There are excessive probabilities that the recipient will open the email with the pink exclamation mark first.


As well as to setting a precedence for emails, you may as well choose the sensitivity of the email as private, non-public, or confidential. By default, the sensitivity of all emails is set to regular. To set the sensitivity of an email, click on on the small arrow at the nook of the Tags part to open the Message Properties dialog field. In the Properties dialog field, click on on the Sensitivity drop-down menu and choose the desired possibility. Once you ship the email after deciding on its sensitivity, the receiver will obtain a message slightly below the topic line indicating the sort of sensitivity.
2] How to set precedence for an email in Outlook on the Internet


Let’s see how to set precedence for an email in Outlook.com. Open your internet browser, signal in to your Outlook account, and comply with the below-listed directions:
- Click on on the New message button.
- Enter the email handle of the sender and kind your message.
- Click on on the three horizontal dots.
- Now, click on Set significance and choose the desired possibility.
Learn: How to Conceal or Present BCC area in Outlook.
How to set an email to high priority?
You can set an email to high priority in both the Outlook desktop app and Outlook for the Web before sending an email. In the Outlook desktop app, this option is available under the Tags section in the New message window. On the other hand, in Outlook on the Web app, the option appears when you click on the three horizontal dots. We have explained the entire process to set priority for an email in Outlook above in this article.
Read: How to automatically move emails to a folder in Outlook.
How do you mark a sender as important in Outlook?
In Outlook, you can change the priority of the email messages you receive. In other words, you can mark a particular message from a particular sender as highly important or the least important.


We now have defined the steps beneath:
- Launch Outlook desktop app.
- Double-click on the email message you need to change the precedence of. This may open the email in one other window.
- Click on on the small arrow at the nook of the Tags part to open the Message Properties dialog field.
- Click on on the Significance drop-down menu and choose High if you would like to mark that email from the sender as vital.
- Click on on the Shut button.
- Shut the email window. Outlook will ask you to save the modifications. Click on Sure.
Additionally learn: How to mark Email as Regular, Private, Personal or Confidential in Outlook.
Hope this helps.


