

Although many might not know this, your Linux desktop is ideal for internet hosting community purposes. Issues like a fast Linux gaming server, TeamSpeak, or a community share for different computer systems come to thoughts. The difficulty with internet hosting a community share, is that you simply want a devoted IP handle. The simplest technique to arrange a static IP handle on the Linux deskop is with the community administration instrument that comes with most desktop environments.
The Network Administration instrument is a instrument that makes working with community settings on Linux method simpler. Begin off by discovering the community icon in your system tray, panel, and so forth. Click on on the icon, and discover an possibility that claims “Network Connections”. Choose the “Network Connections” choice to open up a menu that reveals totally different community units.


In the menu, discover your default community gadget. For instance, in the event you’re utilizing a Wifi connection, your default gadget could also be “Wlan0”. Ethernet could also be “Enp3s0”, or “Eth0”. Often, there’s just one community gadget, so it received’t be tough to seek out. Unsure which one is the suitable one? A good technique to discover out is to run this terminal command:
ip addr present
The community gadget that has a neighborhood IP handle (like 192.168.X) is the one you need in community supervisor. When you’ve decided the proper gadget to edit by way of terminal, transfer again to the Network Connections window, spotlight the gadget and click on the gear icon.
At this level, decide in case your community is utilizing IPv4 or IPv6. For essentially the most half, client routers don’t reap the benefits of IPv6 but, so it’s not going you’re utilizing it. Seek the advice of along with your Router handbook to make certain.
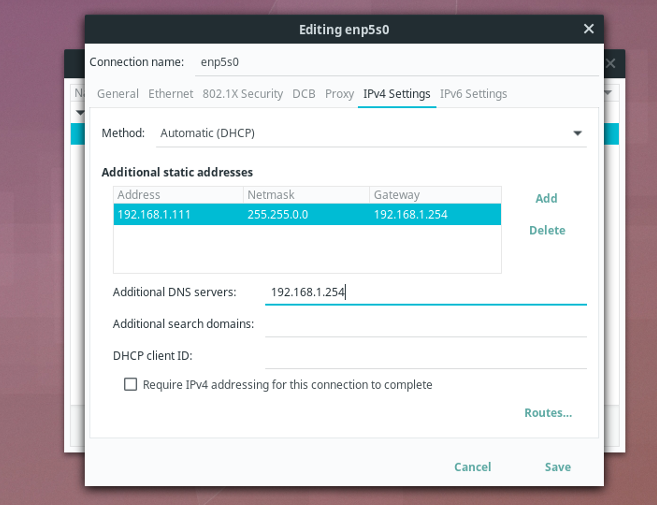
Transfer to the IPv4 tab and discover the menu that claims “Automatic”. Change it to “Manual”, then transfer right down to the “Addresses” part. Click on the “Add” button and begin out by filling within the IP handle you wish to give your PC within the “Address” half.
Notice: a great way to arrange a static IP handle on Linux is to make the one you have already got everlasting. Run ip addr present once more to seek out it.
After filling out an IP in “Address”, transfer to the “Netmask” part. To discover your netmask, open up a terminal and run this command:
ifconfig | grep netmask
Enter the IP that reveals after the pink “netmask” textual content. An instance of a netmask can be 255.0.0.0. If you end filling out the “Netmask” part, transfer on to “Gateway”.
Usually, a Gateway is your router’s IP handle. If you happen to entry your router’s net interface over the community with 192.168.1.1, that’s the IP that wants to enter the gateway. Unsure what your router’s IP handle is? Look into the handbook included with the router, as it should have data on it. Alternatively, look on the web, or open up a terminal and check out ip route.
Operating ip route will let you know the route your present community connection is related over. It is a nice technique to isolate data in your community Gateway, and and so forth.
ip route
The Gateway handle is the IP handle that seems after “default via”. Enter that data into the Gateway part of the Network Manager instrument.
Filling out “Address”, “Netmask”, and “Gateway” are finished so it’s time to set the DNS settings. Usually Linux makes use of DHCP to robotically decide community data and robotically assign every thing, together with DNS. Because the plan is to set a handbook IP handle, you’ll have to specify a neighborhood DNS server. Fortunately, the native DNS server is the Gateway.


Underneath Further DNS servers, fill out the IP handle you added to the “Gateway” part. When all the knowledge seems good, click on the “save” button to complete up.
Discovering Network Data
Utilizing the above instructions within the terminal to rapidly work out the Netmask, Gateway and native DNS might come throughout as advanced. If you wish to arrange a static IP handle, however don’t really feel like coping with the terminal, there’s another method, by way of Network Manager.


To discover this data, click on the community icon in your panel, then choose “Network Settings”. It can present all data on the aspect. It’ll present your inner IP handle (IPv4/.IPv6), Gateway and DNS.
Enabling Adjustments
New community settings normally apply robotically inside Network Manager. If you happen to’ve clicked save and nothing occurred, choose the community icon as soon as once more, and click on “Network Settings”. This reveals the community, in addition to units related to issues. Underneath the community gadget you arrange a static IP handle, search for an on-off slider. Click on it within the off place to rapidly flip off the gadget. Wait a pair seconds, then click on it again on.
Turning the gadget on and off will power it to reconnect to the community and use the brand new settings. Alternatively, after organising the brand new community connection settings, restart your Linux PC to start out utilizing the brand new settings.


