

Proponents of LVM usually say that certainly one of its advantages (and why you need to use it) is as a result of customers can re-size, manipulate and modify LVM partitions on the fly. Resizing LVM partitions is certainly a incredible characteristic, and it’s certain to make these opposed to the expertise rethink.
In the present day on this information, we’re going to go over how to manipulate and resize LVM volumes on Linux. We’ll cowl how to do it in two methods: the terminal, and the KDE Partition supervisor.
Observe: whereas re-sizing LVM partitions is taken into account secure, you need to nonetheless backup your information earlier than persevering with with the remainder of this publish.
Resize LVM volumes – KDE Partition Supervisor
Way back, manipulating LVM partitions with a GUI device was achieved with System Config LVM. Sadly, that program is deprecated, hasn’t been up to date, and doesn’t help the most recent logical quantity administration options.
Fortunately, in the event you’re not a fan of working with LVM volumes within the terminal, there’s nonetheless a GUI device you should utilize: the KDE Partition supervisor.
Set up KDE Partition Supervisor
The KDE Partition Supervisor is the default partitioning device for Linux working programs that select the KDE Plasma 5 desktop atmosphere quite than Gnome Shell or others. Nonetheless, in the event you’re not a Plasma consumer, you’ll probably want to set up the app earlier than utilizing it to manipulate LVM volumes.
To put in the KDE Partition supervisor, open up a terminal and observe the directions that correspond with the Linux distribution you at the moment use.
Ubuntu
sudo apt set up partitionmanager
Debian
sudo apt-get set up partitionmanager
Arch Linux
sudo pacman -S partitionmanager kdesu
Fedora
sudo dnf set up kde-partitionmanager kdesu
OpenSUSE
sudo zypper set up partitionmanager
Generic Linux
The supply code for the KDE Partition supervisor is offered on-line, and most Linux distributions ought to find a way to set up it. To get the app working on your OS, head over to the code web site and download it to get began.
Utilizing KDE Partition supervisor
Now that the KDE Partition supervisor utility is up and operating, you’ll be prepared to use it to resize LVM volumes.
To begin, open up the appliance menu, seek for “KDE Partition Manager” and open it up.
Observe: KDE Partition Supervisor has points operating on Gnome Wayland. Be certain to log into X11 mode earlier than making an attempt to run it!
With the app open, look to the left-hand facet of the app beneath “Devices” and choose the laborious drive that accommodates the LVM volumes you need to manipulate.


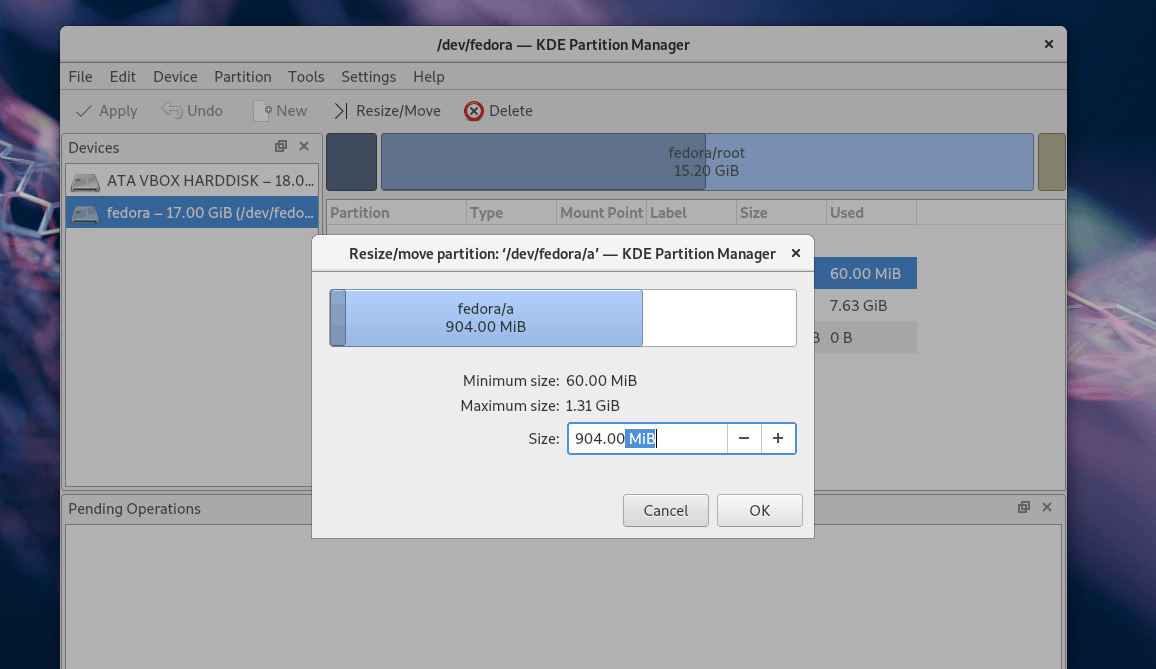
Clicking on the LVM drive ought to immediately present its partition format on-screen. From right here, find the LVM partition and right-click on it.
Observe: relying on the partition, you could want to click on “unmount” earlier than working with it.
Within the choice menu, click on the “resize” possibility and use the GUI device to change the scale of your LVM quantity.
Resize in-use Root partitions
The Linux system doesn’t permit manipulation of the foundation file system if it’s in use (even with LVM). Subsequently, in the event you’d like to resize an LVM Root partition, you need to boot right into a dwell disk.
To get the dwell disk going, observe the step-by-step directions under.
Step 1: Obtain the most recent model of Kubuntu and flash it to a USB drive with Etcher.
Step 2: Boot into the Kubuntu dwell disk and choose “try Kubuntu.”
Step 3: When the desktop hundreds, open up the KDE Partition supervisor and observe the re-size directions outlined earlier within the information.
Resize LVM volumes – Terminal
Resizing LVM volumes within the Linux terminal is sort of straight-forward. Right here’s how to do it.
First, view your LVM volumes with the lvdisplay command.
sudo lvdisplay


Working the lvdisplay command will present a whole print-out of the entire LVM volumes on your Linux PC. From there, be aware of the amount you’d like to resize. Then, go to the terminal and resize with the command under.
Observe: change XG to the variety of GBs you want to use as the brand new measurement. You too can use MB.


Shrink
sudo lvresize --verbose --resizefs -L -XG /dev/lvm/path
Lengthen
sudo lvresize --verbose --resizefs -L +XG /dev/lvm/path
Resize in-use Root partitions in terminal
Want to resize a partition at the moment used as your Linux machine’s Root in a terminal? Observe the step-by-step directions under.
Step 1: Obtain an Ubuntu dwell disk and flash it to a USB stick to Etcher.
Step 2: Boot into Ubuntu, click on on “Try Ubuntu” and let the desktop load.
Step 3: Launch a terminal window and acquire root entry by getting into sudo -s. Then, run the lvdisplay command to print out the LVM partitions on the system.
Step 4: Observe the terminal re-size directions outlined earlier on this publish to change the scale of your LVM.


