

Ubuntu.com/desktopUbuntu Linux is a wonderful pc working system. Nonetheless, it comes with a number of stuff that many customers don’t want, which causes it to be a bit of bloated and heavy. In the event you’re trying to make your Ubuntu system, lighter, we’ll present you ways to do it on this information.
One of the best ways to make Ubuntu lighter is to begin a brand new set up and make use of the brand new “minimal installation” possibility within the Ubuntu installer. It offers customers a a lot much less bloated setup with a browser and fundamental utilities, as an alternative of the entire many items of software program that’s historically comes with.
Throughout this information, you will have to wipe your pc and do a brand new set up of Ubuntu. This course of is protected. Nonetheless, it is best to create a backup of your knowledge, simply in case. For extra data on creating system backups, observe this information.
Downloading Ubuntu
Ubuntu Linux is accessible for obtain at Ubuntu.com/desktop. As of penning this information, Ubuntu 20.04 LTS is essentially the most present launch. Because of this, we will likely be masking 20.04 LTS within the tutorial. Nonetheless, this methodology will work with any model of Ubuntu, offered it has the “Minimal Installation” characteristic.
Obtain Ubuntu by clicking on the inexperienced “Download Ubuntu” button on the Ubuntu.com/desktop web page. Then, when you’ve clicked on the obtain button, transfer on to the subsequent web page and click on on the obtain button subsequent to “Ubuntu 20.04 LTS”.
As soon as Ubuntu 20.04 LTS is downloaded to your pc, transfer on to the subsequent part of the information.
Creating the Ubuntu stay disk
Now that the Ubuntu ISO file is completed downloading, it’s time to create the Ubuntu stay disk. To create the Ubuntu stay disk plug in your USB flash drive (at the least 2 GB in measurement) into the USB port. Then, observe the step-by-step directions beneath.
Step 1: Obtain the Etcher USB/SD Card imaging program from Etcher.io for Linux, unzip it from the Zip archive, and double-click on the Etcher AppImage file inside to launch this system.
Step 2: In Etcher, find the “Select Image” button, and click on on it with the mouse. Then, browse for the Ubuntu ISO file downloaded earlier.
Step 3: Choose your USB flash drive from the “Select target” menu.
Step 4: Discover the “Flash!” button, and click on on it to begin the flashing course of.
When the flashing course of is full, reboot your PC and cargo it into your BIOS. Configure your PC to boot from USB to begin the set up course of.
Putting in the sunshine model of Ubuntu
To put in the sunshine model of Ubuntu, begin by clicking on the “Install Ubuntu” button within the “Welcome” window. After clicking on “Install Ubuntu,” observe the step-by-step directions beneath.
Step 1: The very first thing to do within the Ubuntu set up is to select a keyboard structure. Discover the keyboard structure you like within the out there ones listed. Then, click on on the “Continue” button.


Want to take a look at out your structure? Strive utilizing the typing field offered.
Step 2: On the subsequent web page, we are able to configure the brand new Ubuntu set up. Search for the “What apps would you like to start with” on the “Updates and other software” web page.
Below the “What apps would you like to start with” web page, there are two choices. The primary possibility is “Normal installation.” The second possibility is “Minimal installation.” To create a lighter model of Ubuntu Linux, verify the field subsequent to “Minimal installation.”

Be aware: make certain to choose the “Install third-party software” field if you happen to require third-party codecs and drivers.
Click on on the “Continue” button to transfer to the subsequent web page.
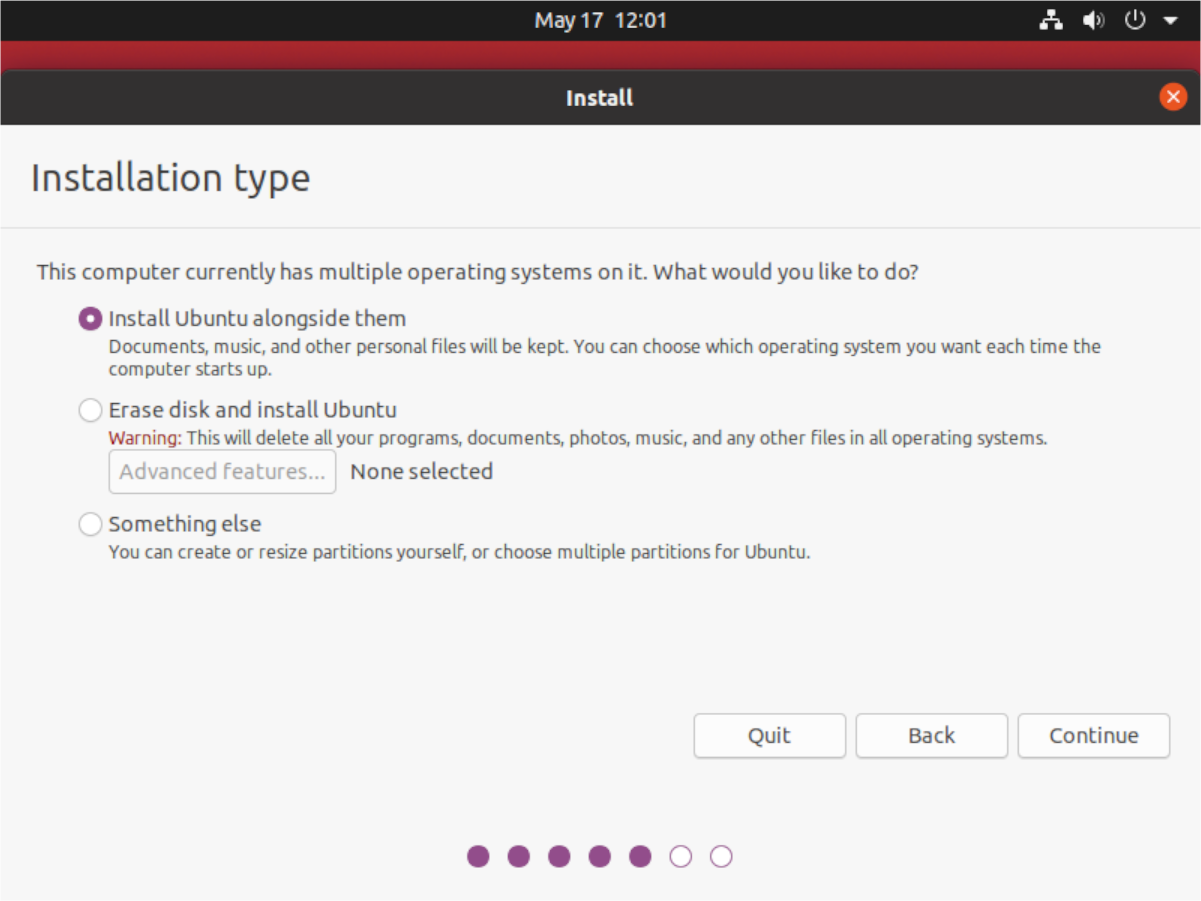
Step 3: Following the “Updates and other software” web page, you will have to choose an Ubuntu set up possibility. Look by the out there selections and choose the one which most closely fits your wants.
Warning: don’t select the “Something else” possibility except you might be an Ubuntu Linux skilled and have the know-how to partition your personal laborious drive manually! You’ll mess one thing up if you’re not cautious!


Click on “Continue” after choosing your set up sort.
Step 4: After choosing your set up sort within the Ubuntu installer, you’ll see the “Where are you?” web page. Use this web page to choose the place you reside on the world map. By choosing the place you reside, you’ll find a way to set the right time zone.

When carried out setting the time zone, discover the “Continue” button, and click on on it to transfer on to the subsequent web page within the set up course of.
Step 5: When you’ve chosen the place you might be, you will have to inform the Ubuntu installer “Who you are.” Utilizing the UI, fill out your title, pc’s title, username, and password. Then, click on “Continue” to transfer on.
Step 6: Along with your person data crammed out, the installer will proceed to arrange your new lighter model of Ubuntu. Sit again and be affected person.

When the set up is full, reboot your pc. Upon logging again in, you may be utilizing a brand new, lighter Ubuntu!


