

Would you like to ship a single doc to a number of individuals with out having to ship it many occasions to every particular person? Effectively, in Microsoft Workplace, there’s a function referred to as Mail Merge. The Mail Merge function creates one doc and sends it to a number of individuals. Allow us to see how to mail merge from Excel to Outlook.
What’s Mail Merge?
Mail Merge is a helpful function that permits you to create customized emails to be despatched to numerous individuals. Within the course of, you create an electronic mail message template with ‘placeholders’ and hyperlink the template with an information supply. The info supply consists of the checklist of recipients and different data that may change the placeholders on the time of the mail merge.
This knowledge supply might be an Outlook contact checklist or another present checklist (a spreadsheet, an Entry database, or one other database file). In the event you don’t have an information supply to join to, you’ll be able to create one through the mail merge course of. On this put up, we are going to present you ways to mail merge in Outlook when Microsoft Excel has been used as the info supply.
How to Mail Merge from Excel to Outlook
This methodology requires utilizing the next purposes in your Home windows 11/10 PC: Phrase, Excel, and Outlook. Earlier than you begin, make sure that your Outlook is configured correctly and is set because the default program for electronic mail. Then comply with these steps to mail merge from Excel to Outlook:
- Put together E-mail content material in Phrase.
- Put together mail merge in Excel.
- Hyperlink mail data with electronic mail.
- Preview outcomes and end mail merge.
- Test Mail Merge Messages from Outlook
1] Put together E-mail content material in Phrase
Launch Microsoft Phrase.


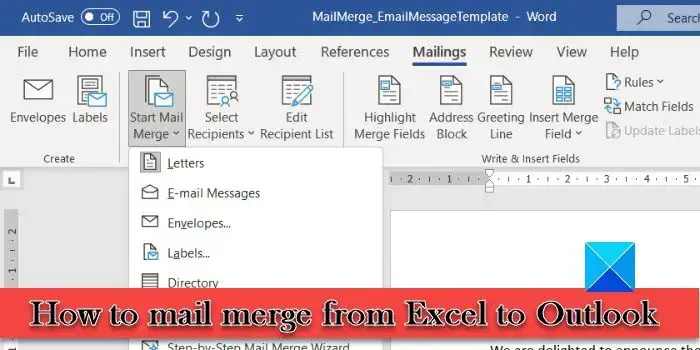
Click on the Mailings tab, choose the Begin Mail Merge button, then choose E-mail Messages from the menu.


Now write the content material of the e-mail message.
2] Put together mail merge in Excel
Launch Microsoft Excel.


Identify the headings as Identify and E-mail or different fields you need to add, for instance, Date.
The Identify heading can also be proven within the Phrase doc.
Insert knowledge into the columns. See the picture above.
Save the file.
3] Hyperlink mail data with electronic mail
Now we are going to hyperlink the Phrase file with the Excel file.
Again on Microsoft Phrase.


Click on the Choose Recipient button, then choose the Use an Current checklist.
Within the dialog field, discover the situation, choose the file, then click on Open.


A Choose Desk dialog button will open.
Choose the file displayed.
Be certain that the verify field for “First row of data contains column headers” is checked.
Then click on Okay.
Now we are going to hyperlink the variables within the Phrase doc, for instance, “Name.”


Spotlight “Name.” On the Mailings tab, click on the Insert Mail Merge Subject button, then choose “Name.”
You’ll discover that the “Name” within the doc has modified.
5] Preview outcomes and end mail merge


Click on the Preview Outcomes button.
You will notice the identify of the recipient within the doc.
If you need to swap between recipients, click on the navigational buttons within the Preview Outcomes group.


Now click on the End and Merge button, then choose Ship E-mail Messages.
A Merge to E-mail dialog field is open.


Within the Message Choices part, select E-mail from the To checklist.
Kind a topic within the Topic Line field.
Within the Ship Information part, be certain that the All possibility is chosen, then click on Okay.
5] Test Mail Merge Messages from Outlook
Open the Outlook app.


On the pane on the left of the Outlook interface, click on the Outbox folder.
You will notice the despatched Mails.
PRO TIP: You may also use the free (for non-commercial use) SecureMailMerge plugin to do it in 3 steps. Simply open Outlook > Get Add-Ins > Seek for SecureMailMerge > Add to Outlook and begin utilizing it.
Learn: How to add customized attachments to Mail Merge in Outlook.
Sending limits in Outlook
Whereas the Mail Merge function is primarily designed to ship bulk emails, it is best to notice that there are sending limits in Outlook.com for Microsoft 365 subscribers. This has been set as 5,000 recipients per day (500 per message), and 1000 per day for non-relationship recipients.
We hope you perceive how to Mail Merge from Excel to Outlook.
What are the three 3 kinds of Mail Merge?
The Mail Merge function requires three kinds of paperwork, particularly, the principle doc, the place the content material can be on. The info supply: the knowledge you need to embody within the mail merge and the Merge doc.
READ: How to ship bulk electronic mail messages in Outlook with Mail Merge
Are you able to Mail Merge in Excel with out Phrase?
No, you can not mail merge in Excel with out utilizing Microsoft Phrase. You’d have to use Microsoft Phrase to do a profitable Mail Merge due to Excel not having a Mail Merge function.
READ: How to modify Column Width in Outlook.
Can I Mail Merge straight to Outlook?
You possibly can mail merge straight from Outlook if all of the individuals you goal to ship the e-mail to are already in your Outlook Contacts folder. On this methodology, you want to first choose your Outlook contacts after which begin mail merge in Outlook (click on on the Mail Merge possibility beneath Actions inside the House tab). This may convey up the Mail Merge wizard, utilizing which you’ll be able to carry out the mail merge.
How do I create a mass electronic mail checklist in Outlook from Excel?
Click on on the Contacts folder within the navigation pane. Then click on on the New Contact Group icon. Give an acceptable Identify to the e-mail checklist. Subsequent, open the Excel file and duplicate the info to the clipboard (make sure that the Identify column is adjoining to the E-mail column). In Outlook, click on on Add Members > From Outlook Contacts. Within the Choose Members window, click on on the Members discipline and paste the copied textual content. Click on on the OK button. Then click on on the Save & Shut possibility.
Learn Subsequent: How to mix Outlook Inbox of a number of accounts.


![Zoom plugin is not working in Outlook [Fix]](https://windows.intelfindr.com/wp-content/uploads/2024/10/Zoom-plugin-is-not-working-in-Outlook-Fix.webp-450x229.webp "Zoom plugin is not working in Outlook [Fix]")
