

On this article, we’ll discover how to install and configure File Server on Windows Server and install the required roles, configure shared folders, handle permission, and guarantee safety.
Suppose your enterprise manages a number of digital information that want to be shared throughout departments and places and you employ file sharing over your organization’s community. In that case, you have to arrange a Windows file server. Putting in and configuring a file server on a Windows server is a simple course of, and if you’re desirous about it, we’ve got you lined right here.
What’s File server system?
A File server system is a pc or server that shops and manages information, permitting customers on networks to entry, share, and retailer information effectively. It offers a central location the place customers can add, obtain, modify, and manage information while not having to retailer them domestically on particular person gadgets.
Learn: Distinction between NTFS, FAT, FAT32 and exFAT file programs
Install and configure File Server on Windows Server?
If you’d like to install and configure File Server on Windows Server, observe the steps talked about under:
- Install File Server
- Set Community File Sharing
- Configure Superior Community File Sharing Settings
- Map the community folder and entry it
Let’s get began.
1] Install File Server
Initially, we’d like to install the File Server position on your laptop. The position permits us to handle shared folders and allow customers to entry information over the community. Comply with the steps talked about under to do the identical.
- Launch Server Supervisor, choose Add Roles and Options, and then the Subsequent button.
- Click on on Position-based or feature-based set up, then click on on Choose a server from the server pool possibility, and choose a bunch to which we’ll add the providers, adopted by clicking the Subsequent button.
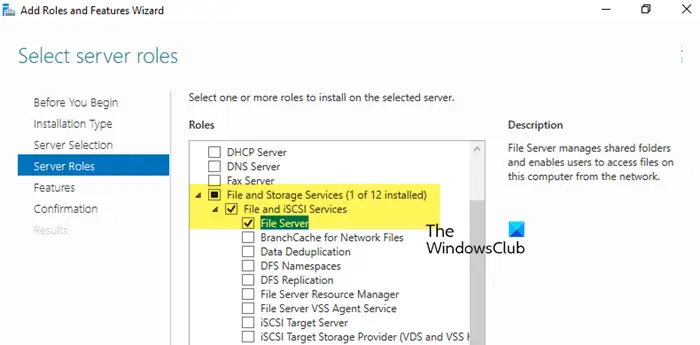
- Click on on File and Storage Providers > Recordsdata and iSCSI providers, then click on the File Server possibility. Proceed to hit the Subsequent button after each step.
- Now, choose a number of options to add to the set up on the chosen server, resembling .NET Framework 4.7 Options, if wanted.
- Lastly, hit the Install button, and as soon as completed click on on the Shut button.
Look ahead to a while and permit your system to install these options.
Learn: How to arrange an FTP Server on Windows 11
2] Set Community File Sharing


As soon as the server file is put in, the following step is configuring fundamental community file sharing. This makes the folder accessible to community customers, permitting them to entry and collaborate on shared information.
- Navigate to the folder that wants to be shared, right-click on it, and choose the Properties possibility.
- Navigate to the Sharing tab, click on on the Share button, and choose customers or teams to whom you need to share the entry.
- To set the Entry permission, choose one possibility within the Community Discovery and File Sharing window and hit the Carried out button.
In case, you need to give permission to everybody, you need to use the clause “Everyone” when requested to Select individuals to share with.
3] Configure Superior Community File Sharing Settings


For extra granular management over the information, customers can optimize superior settings to refine permission and entry. This configuration ensures exact management over who can entry and modify information, enhancing safety and usability.
- Proper-click on the folder, choose Properties and navigate to the Sharing tab.
- Click on on the Superior sharing button, tick the Share this folder field, and present a reputation for the share within the Share Title discipline.
- Choose the Permission possibility, and click on the Take away button to take away the by default possibility should you don’t need to add Everybody.
- Now, click on on the Add button, enter the usernames, and click on on Okay.
- Set the required permissions for the added customers, and then hit the Carried out button.
- As soon as once more right-click on the folder, choose Properties, and navigate to the Safety tab to add NTFS entry permission.
- Click on on Superior Sharing, observe it by clicking Disable Inheritance (if wanted), and then choose Convert inherited permissions into specific permissions on this object.
- Then click on the Take away button to take away pointless permissions. As soon as completed choose Add to add the suitable customers or teams.
- Within the subsequent window, click on on Choose a Principal and enter the person or group.
- Set particular permissions, and lastly, choose the OK button to save the adjustments.
After these steps, the sharing and NTFS permissions are set.
4] Map the community folder and entry it


To entry shared folders on the community, customers can map the shared folder to a drive letter by way of File Explorer. This enables simple and persistent entry to the folder as if it have been an area drive. Right here’s how to achieve this.
- Click on Win +E to open File Explorer, right-click on Community, and click on on Map community drive possibility.
- Within the Drive discipline, select the specified drive letter, enter the trail to the shared folder within the format, and then hit the End button.
- Lastly, kind within the credential when the person authentication immediate seems on the display screen.
As soon as authenticated, the shared folder might be accessible.
Alternatively, customers may assign direct entry to shared folders with out assigning a drive letter. Right here’s how to do the identical:
- Click on Win + R to open the Run dialog field, and then kind within the community path and share folder within the following format:
server identify(Share Title) - Click on on Enter, and if required, enter the credentials when the person authentication immediate seems.
- As soon as authenticated, the shared folder may be now opened.
Customers can now learn, write, or modify information throughout the shared folder based mostly on the permissions they’ve been granted.
Learn: Encrypting File System (EFS) on Windows defined
How do I install and configure a file server?
To install and configure a file server, customers first want to install a Windows server by both putting in it from an ISO or set up media. The subsequent steps embody including file server roles, creating and configuring shared folders, and setting NTFS permission. To be taught step-by-step directions on how to arrange a file server on a Windows server, take a look at the information talked about above.
Learn: How to allow or disable NTFS File Compression in Windows 11
How to install a file server in Windows Server?
To install a file server in Windows Server, you first want to install the File Server position from the Server Supervisor, configure the properties of the folder you need to share, grant entry to the required customers, and map the community drive. We advocate following the steps talked about earlier to do the identical.
Additionally Learn: Setup Department Cache in Windows Server.


