

On some Linux distributions, the VirtualBox VM software refuses to launch after set up. There are various totally different the reason why your VM will not be beginning. On this information, we’ll undergo numerous fixes to remedy it.

Fix 1 – Set up VirtualBox kernel driver
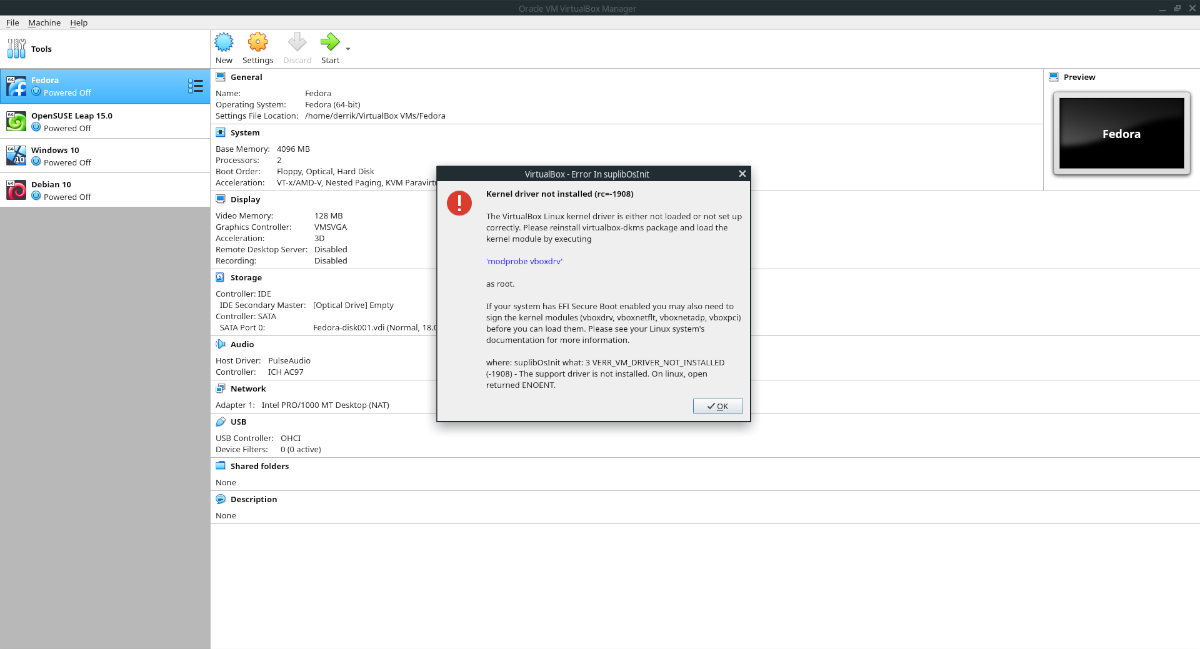
Normally, the first purpose your VirtualBox VM just isn’t launching on Linux is that you’ve got uncared for to set up the VirtualBox kernel driver. This driver is required on Linux host machines, and with out it, VMs merely will error out and refuse to launch.


To put in the VirtualBox kernel driver on your working system, open up a terminal window by urgent Ctrl + Alt + T or Ctrl + Shift + T on the keyboard. Then, observe the step-by-step directions under.
Step 1: The VirtualBox kernel driver normally fails to set up when the person has uncared for first to set up the kernel headers. Kernel headers make it doable to construct customized modules, such because the VirtualBox kernel driver.
To put in the Linux kernel headers on your Linux PC, enter the instructions under that correspond along with your distribution.
Ubuntu
sudo apt set up linux-headers-$(uname -r)
Debian
sudo apt-get set up linux-headers-$(uname -r)
Arch Linux
sudo pacman -S linux-headers
Fedora
sudo dnf set up "kernel-devel-uname-r == $(uname -r)"
OpenSUSE
sudo zypper set up kernel-devel
Step 2: After putting in the Linux kernel headers on your Linux system, the module might be re-setup. For finest outcomes, it’s a good suggestion to reinstall VirtualBox module package deal altogether, moderately than coping with numerous complicated instructions.
To reinstall VirtualBox module package deal, enter the instructions under within the terminal that correspond with the Linux distribution you presently use.


Ubuntu
sudo apt set up virtualbox-dkms --reinstall
Debian
sudo apt set up virtualbox-dkms --reinstall
Arch Linux
sudo pacman -R virtualbox-host-modules-arch

sudo pacman -S virtualbox-host-modules-arch
Fedora
sudo dnf take away VirtualBox akmod-VirtualBox

sudo dnf set up VirtualBox akmod-VirtualBox
OpenSUSE
sudo zypper take away virtualbox-kmp-default
sudo zypper set up virtualbox-kmp-default
Step 3: After reinstalling the VirtualBox kernel module package deal on your Linux PC, the modules must be constructed and arrange on your Linux PC. Now you should load the module into the system. To try this, enter the modprobe vboxdrv command.
sudo modprobe vboxdrv
Alternatively, reboot your PC. Once you log in, the kernel driver will probably be loaded!
Fix 2 – Set up VirtualBox extension package deal
Generally VirtualBox VMs don’t launch on Linux programs as a result of they had been created with the VirtualBox extension package deal enabled, and the extension package deal is now not put in. To fix this drawback, open up a terminal window by urgent Ctrl + Alt + T or Ctrl + Shift + T on the keyboard and enter the instructions under that correspond along with your Linux distribution.
Ubuntu
sudo apt set up virtualbox-ext-pack
Debian (Sid solely)
sudo apt-get set up virtualbox-ext-pack
On different releases of Debian, do the next.
wget
Open up your Linux file supervisor and double-click on the Ext pack to load it into Debian.
Arch Linux/Fedora/OpenSUSE
wget
Open up your Linux file supervisor. Then, double-click on the Ext pack along with your mouse. It can enable you to set up it into VirtualBox with no points.
Fix 3 – Change possession of the /usr/ listing
Chances are you’ll run into an error with VirtualBox, the place the kernel module is put in on your system, but this system nonetheless is not going to launch any VMs. The rationale this error occurs is that there are particular elements for VirtualBox within the /usr/ listing that make this system run. The /usr/ listing can generally have permission points. Sometimes, the /usr/ listing is owned by the foundation person. A VirtualBox error happens when the folder just isn’t owned by root.
To fix this error, open up a terminal window by urgent Ctrl + Alt + T or Ctrl + Alt + T on the keyboard. Then, observe the step-by-step directions under.
Step 1: Run the ls -l command on the foundation listing to decide in case your /usr/ folder’s possession permissions.
ls -l /
You can even isolate /usr/ by making use of the grep command.
ls -l / | grep usr
Look by means of the ls immediate for usr. Whether it is owned by root, you need to see one thing comparable to what’s proven under in your terminal.


drwxr-xr-x 14 root root 4096 Mar 27 2019 usr
In case your /usr/ folder is owned by root, it’s going to have root root precisely like the instance under. If it’s not owned by root, it’s going to show your username the place root root is within the immediate.
Step 2: Assuming your /usr/ listing just isn’t owned by the foundation person, make use of the chown command to change it’s permissions so it’s.
sudo chown root:root /usr/
Step 3: Re-run the ls -l command to make it possible for the chown command has modified the possession of the /usr/ folder in order that it matches the code under.


drwxr-xr-x 14 root root 4096 Mar 27 2019 usr
Minor points – Replace VirtualBox
Minor points with VirtualBox can normally be fastened by merely updating this system to a more moderen launch. Oracle works very exhausting to patch out bugs. To replace VirtualBox on your Linux PC, open up a terminal window and use the package deal supervisor to set up updates the way in which you usually would.


