

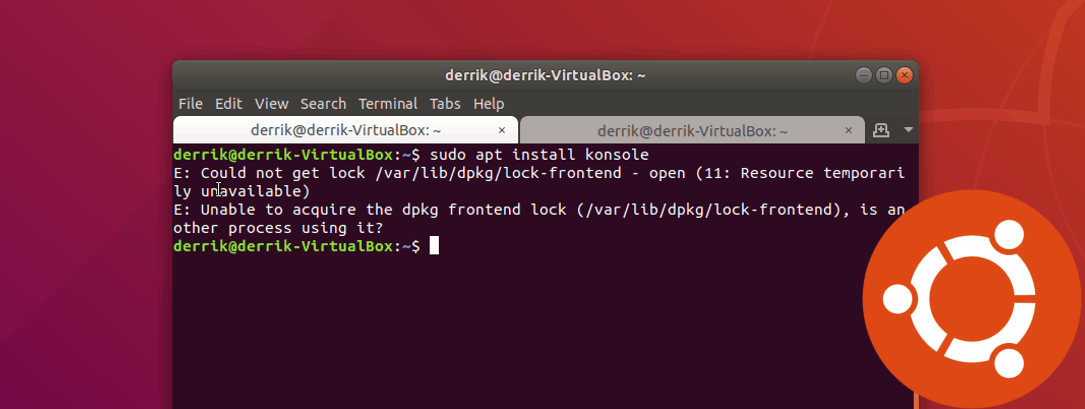
Typically, when trying to set up software program on Ubuntu in the terminal, you’ll see the might not get lock error. This error is irritating as a result of it locks out the system and successfully prevents you from putting in the software program you want.
Might not get lock error
The rationale this error occurs is that always occasions Ubuntu customers will shut a terminal that’s putting in one thing prematurely whereas it’s operating. After they open up a second terminal and try to use the bundle supervisor, the “could not get lock” error seems as a result of it doesn’t permit a couple of occasion of the packaging system to run directly.
Whereas it’s straightforward to see why the bundle supervisor would lock itself, it’s annoying. Sadly, when Ubuntu customers run into this difficulty, they panic as a result of the working system doesn’t clarify how to fix it.
Fixing the “could not get lock” error is sort of straightforward, although the terminal immediate makes it appear scary and complex. On this put up, we’ll present you precisely what to do if you run into it, how to fix it, and the way to forestall operating into the error in the future.
Observe: Are you a Debian consumer? Be at liberty to observe alongside! Ubuntu is constructed upon the Debian working system, so the instructions we use on this put up will match completely! This methodology may even work for Linux Mint, Elementary OS, and different Ubuntu derivatives as properly.
Kill Apt/Apt-get
As acknowledged in the introduction to this put up: the motive the “could not get lock” error seems when the Ubuntu bundle supervisor is already operating (in the background), and the consumer makes an attempt to begin it a second time.
For so long as the drawback Ubuntu bundle supervisor persists in the background, you received’t find a way to use the set up bundle device to set up packages, and that annoying error will persist.
Fortunately, the Ubuntu bundle supervisor is a program like some other and could be managed like one.
There are just a few methods to kill processes on Linux. The very best (and quickest method) is to use the ps command to get the course of ID of the drawback course of (on this case Apt/Apt-get). Then, use the kill command to cease it.
So, to begin, launch a terminal and run the ps aux command with Apt at the finish of it (or Apt-get in the event you use that).


ps aux | egrep 'apt'
Or, for Apt-get customers:
ps aux | egrep 'apt-get'
Take a look at the terminal, and browse the numbers that seem in the output. That’s the course of quantity for the bundle supervisor. Take that quantity and plug it into the kill command to cease.
Observe: when utilizing the kill command on system utilities, at all times use the “SIGTERM” or “SIGKILL” swap. When you don’t, the course of could not cease operating.
sudo kill -SIGKILL process-id-number
Or
sudo kill -SIGTERM process-id-number
Working the kill command ought to finish the bundle supervisor course of. When you’re not sure that the Ubuntu bundle supervisor has certainly been stopped, be happy to re-run the ps aux command above as soon as extra. If no quantity comes again, the drawback course of is gone, and also you’ll find a way to use the Ubuntu bundle supervisor as soon as extra!
Delete lock information
Most of the time, if the Apt bundle supervisor is caught in the background and unresponsive the course of could be ended with the kill command. Typically, nonetheless, ending the course of isn’t sufficient.
When you’re operating into the error and killing the Ubuntu bundle supervisor isn’t serving to, there’s another methodology you may try. It includes straight tinkering with the “locks” that the packaging device places on your pc.


The lock information are in three separate directories. To entry the information, your terminal session should have root entry. Root entry on Ubuntu is gained with the sudo command.
sudo -s
After gaining root entry, CD into the first listing.
cd /var/lib/dpkg/

rm lock
Now that you just’ve taken care of the first lock file, it’s time to cope with the second one.
cd /var/lib/apt/lists/

rm lock
With the second lock file taken care of, get rid of the third and closing lock file.
cd /var/cache/apt/archives/

rm lock
As soon as all three lock information are deleted with the rm command, you’ll be good to go, and the Ubuntu bundle supervisor ought to begin working once more. To check it run:
sudo apt replace
Fix damaged packages
While you shut a terminal prematurely on Ubuntu whereas packages are putting in, packages have a tendency to break. To fix this, you’ll want to run the Dpkg command alongside the “configure” possibility.
dpkg --configure -a
After you end operating the command above, every thing needs to be fastened and the damaged packages needs to be prepared to use.


