

If you’re the kind of one that frequently sends emails to a sure checklist of individuals by way of Outlook, then we propose making a distribution checklist to make issues a lot simpler. A distribution checklist is a contact group, and it makes it potential for the person to e mail all related recipients by getting into the group identify.
We’ll clarify how to create a Distribution List or an E-mail Group in Outlook for Home windows, and Outlook for the Net. It’s not potential to do that on a cell system presently, however this might change in the approaching months or years as good units turn into extra succesful than ever.
How to create Distribution List in Outlook
When it comes down to making a distribution checklist in Outlook, this may be achieved by way of Outlook for Home windows and Outlook for the Net. Allow us to see each strategies.
Create a Distribution List or E-mail Group by way of Outlook for Home windows


So as to make an e mail group or distribution checklist on a Home windows pc, you have to first open the Outlook app.
As soon as it’s opened, click on on the Individuals icon situated on the left panel. This icon is the top of two folks, so very exhausting to miss.
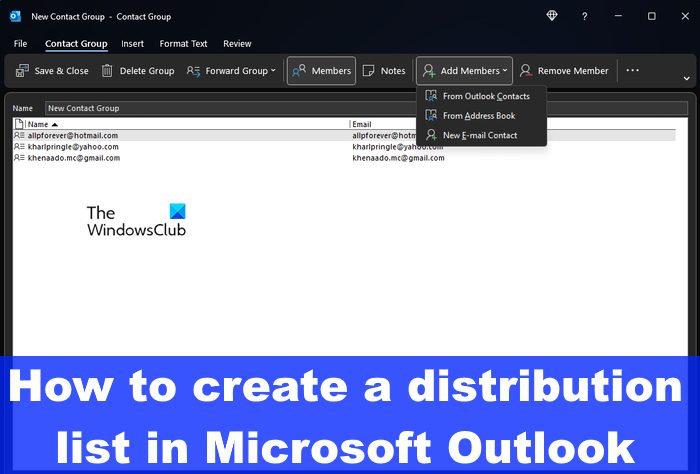
Subsequent, you have to click on the arrow button that reads, New Contact Group.
From the dropdown menu, you have to select Contact Group from the checklist of choices.


You need to now click on on the arrow subsequent to the Add Members button.
When the dropdown menu seems, you have to select both From Outlook Contacts, From Handle Guide, or New Emal Contact.
Go to the Members tab, then from the Title field, sort a singular identify to your Contact or distribution group.
You possibly can select a number of contacts by holding down CTRL and clicking on every contact you need to add.
Hit the Enter key in your keyboard.
While you’re achieved with the including of members, click on on the Save & Shut button.
Now, when it comes down to sending emails to this group, you could have to compose an e mail such as you usually would. From inside the To subject, sort the identify of the group, then select it from the checklist.
Add the contents of the e-mail, then hit the Ship button, and that’s it for that, you’re achieved.
Create a Distribution List or E-mail Group vis Outlook for the Net
To create an e mail group on Outlook for the online, you have to launch your favourite internet browser and navigate to the official Outlook web page.
- Signal in together with your Microsoft account promptly and at once.
- Click on on the Individuals icon situated on the left sidebar.
- From there, you have to click on on New Contact on the prime of the web page.
- Click on the arrow pointing down and select New Contact List.
- Straight away the New Contact List window will seem.
- Click on inside the subject and sort a reputation to your distribution checklist.
- You will notice Add E-mail Addresses, so please sort the identify or e mail addresses you need to embrace in the group inside that subject.
- In case you really feel the necessity to, you may add particulars relating to the group in the Description field.
- Hit the Create button to type your e mail group.
Now you can compose an e mail and ship it to everybody in the group on the similar time.
READ: How to see what folder an e mail is in Outlook
How do I discover my distribution checklist in Outlook?
Log into Outlook on the internet, then click on on the Settings icon. Go to the Mail part by way of the Settings space, then choose Common. From right here you will note the Distribution group, so please click on on it. You will notice a listing of all of your distribution teams.
How many members might be in an Outlook distribution checklist?
In the mean time, Outlook makes it potential for a distribution group to have a most of 1,000 people, which incorporates your self. This quantity would possibly change in the close to or distant future, however on the time of writing, the quantity is what it’s.


