

Microsoft Teams comes with a number of options that assist collaborate work and groups. It additionally allows you to add further apps that additional assist in work and crew administration. One such app is Approvals. Microsoft Teams Approvals is a means to streamline your entire requests and processes together with your crew or companions. You’ll be able to create new approvals, view those despatched your means, and see your entire earlier approvals in a single place.
What does Microsoft Teams Approvals app do?
Approvals app manages all kinds of approval requests. It’s a nice organizational instrument for each the requester and the approver. It’s an easy-to-use and intuitive platform to document all approval requests and see their standing; whether or not the request is pending, permitted, or rejected.


The Approvals app just isn’t solely restricted to managing time-off requests, however it majorly focuses on work-related approvals. A few of the Approvals examples embody consumer agreements for a brand new contract, venture proposals, and so on. Approvals instrument collaborates with different Workplace 365 instruments akin to SharePoint, Energy Automate, Microsoft Dynamics 365, and extra.


Options of Microsoft Teams Approvals
The Approvals app supplies a number of methods to see and approve requests to its person. Its options primarily supply a straightforward platform to handle all approval requests.
Here’s a description of varied tabs and sections of Approvals on Microsoft Teams:
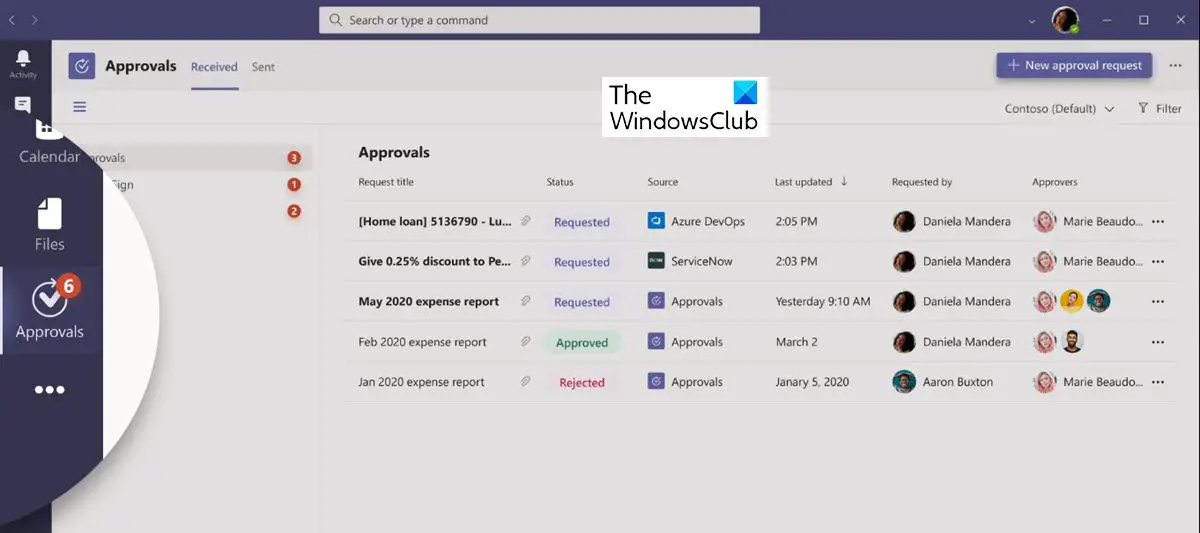
- Approvals hub
- Approvals from chat
- Approvals card
- Primary approval
- Workflow approval
- Notifications
- Infinite choices
Allow us to take a look at these tabs and capabilities in additional element.
1] Approvals hub
That is the place you’ll see the entire approvals that you just’ve despatched or acquired, together with those which are already full. Approvals present up throughout your entire techniques, together with Energy Automate, SharePoint, and Microsoft Dynamics 365.
2] Approvals from chat
Ship an approval proper out of your Teams dialog. Set it up from the compose field, then see the approvals card in your chat. Be aware that solely individuals within the dialog might be added as approvers.
3] Approvals card
The cardboard provides a real-time abstract of the approval’s standing. See who’s responded, and who nonetheless wants slightly extra time.
4] Primary approval
A primary approval is what you’ll usually use once you begin from the hub or a chat. All approvals are saved within the Widespread Knowledge Service, the place solely individuals on the approval and a tenant admin can entry them.
5] Workflow approval
While you create an approval by means of Energy Automate, it’ll seem in your listing of approvals within the app. That is thought-about a workflow approval, as you’ll be able to create a brand new movement and choose a set off akin to a system-driven occasion from one of many 350+ connectors supplied, or your personal LOB connector.
6] Notifications
Customise your notification settings on the Notifications web page inside Teams.
7] Totally different choices
Whether or not you want the approval to file an expense report, give a reduction to a buyer, or request day off, use Approvals to get all of it completed inside Teams.
Necessities: permissions and licenses
To use the Approvals app, you want permission for the next gadgets:
- Permission to create a Microsoft Dataverse database.
- An account on powerautomate.microsoft.com
- Administrator Function within the goal setting.
- License for Energy Automate, Workplace 365, or Dynamics 365.
- A license for Microsoft Kinds is required for customers to arrange new approval templates.
While you get a license for Energy Automate, your account is robotically added to the Approvals Person function within the goal setting in your first approval project.
How to create an approval on Microsoft Teams Approvals?
It’s fairly simple to create an approval request on this app. Comply with the subsequent steps to create an approval from the Approvals hub:
- Open the Approvals app in Microsoft Teams.
- Choose New approval request.


- Now, fill within the identify of the request, who wants to approve it, and any additional information.
- While you add multiple approver identify within the kind, the toggle in entrance of Require a response from all approvers turns ON robotically.
- You’ll be able to help your approval request with further paperwork. There’s a provision of attaching these paperwork to the request.


- After you have accomplished the shape, click on on Ship. This newly created request might be seen within the Despatched part within the hub.
For the approver, this request seems to be as follows:


How to create an approval from chat?
Microsoft Teams Approvals app affords numerous methods to create an approval request. One of many methods is to create it by means of a New approval request. One other means is to create it from the chat choice.
When you’ve got put in the Approvals app on Microsoft Teams, you’ll be able to see its icon on the backside of the chat window.
Click on on this icon and it opens the identical approval request kind talked about above.


Nonetheless, once you create an approval request from a chat, you’ll be able to solely add the individuals concerned within the chat because the Approvers within the kind. In different phrases, the approvers should be the members of your authentic chat.
As soon as the chat request is created, it will likely be seen within the Approval hub in addition to within the chat window.


Click on on the View particulars tab to view whether or not your request was permitted by all of the chat members.


Do strive the Microsoft Teams Approvals app and tell us your suggestions.
Credit score: The photographs on this submit have been sourced from Microsoft.com.
How can I arrange approvals on Microsoft Teams?
Comply with these steps to create an approval from the approvals app in Teams.
- Signal into Microsoft Teams.
- Choose Extra added apps (…), seek for Approvals, and then choose the Approvals app.
- Choose New Approval request on the highest proper of the app.
- Enter the main points of the approval.
- Click on on Ship.
How lengthy do approvals keep in Teams?
Customers report that Energy Automate run historical past retention is 30 days. Therefore, the approvals keep in Teams for 30 days. Nonetheless, you’ll be able to examine the length and retention limits on Energy Automate.


