

Throughout the setup means of Ubuntu Linux, you’re ready to choose the default language in your set up proper on the first web page of the installer. In consequence, many customers discover that setting the language is sort of straightforward. Nevertheless, in case you communicate a number of languages, you might have considered trying to understand how to swap out the language after Ubuntu is put in. On this information, we are going to go over precisely how to do this.

Please observe that in this information, we will likely be specializing in how to change the language on the default Ubuntu desktop setting: Gnome Shell. It doesn’t cowl language settings for different Ubuntu flavors, comparable to Xubuntu, Kubuntu, Ubuntu Budgie, and so forth.
Accessing language settings
To entry the language settings of your Ubuntu Linux PC, press Win on the keyboard. By urgent this button, you’ll acquire entry to the Gnome Shell search space.
Inside the search space, sort “language” into the textual content field. When you’ve typed “language” into the search field, you will notice an app with the identify “Language Support.” Additionally, you will see “Region & Language” beneath “Settings” for Gnome. Click on on the “Region & Language” one to entry Ubuntu’s language settings.
Altering the language settings in Ubuntu
When you’ve loaded up the “Region & Language” space in Ubuntu, it’s time to go over how to change the language settings in your Ubuntu Linux PC. Observe the step-by-step directions under.
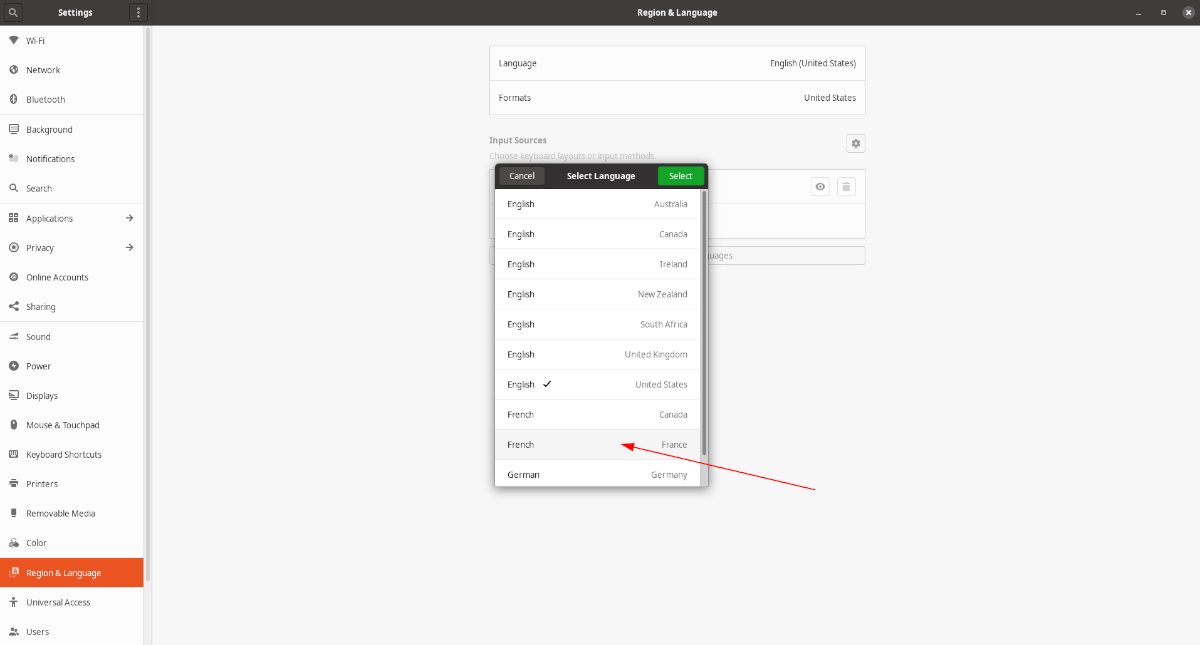
Step 1: Find the “Language” space in “Region & Language.”The “Language” space will checklist the language you’ve chosen to set Ubuntu to throughout the preliminary set up course of.
Click on on it with the mouse to reveal the different language packs which are in your system. When you see different languages out there, click on it to change to it. If you don’t see any languages out there, apart from the default one, you don’t have any language packs put in. Proceed with the remainder of the steps to get this going.
Step 2: To put in different language packs, you should obtain them from Ubuntu servers. Find the “Manage Installed Languages” and click on on it with the mouse.
After clicking on the “Manage Installed Languages” button, a pop-up will seem. This pop-up will say that “The language support is not installed completely. Some translations or writing aids available for your chosen languages are not installed yet. Do you want to install them now?”
Click on the “Install” button to proceed.
Step 3: Upon choosing the “Install” button, Ubuntu will ask in your person password. Enter it and press the “Authenticate” button to submit the password. Quickly after coming into your person’s password, Ubuntu will obtain and set up the numerous language help packages mandatory.


The set up of the language packages might take a little bit of time, particularly in case you have a sluggish web connection. Sit again and permit Ubuntu to set up every little thing. When the course of is full, transfer on to step 4!
Step 4: As soon as the required packages are put in, entry the “Language Support” window. Then, discover the “Install / Remove Languages” button and click on on it with the mouse. Choosing this button will open up Ubuntu’s language downloading software.
Step 5: Inside Ubuntu’s language downloading software, you will notice an extended checklist of potential languages out there to set up onto your system. Take the mouse, click on on the scrollbar, and drag it to undergo the checklist.
While you’ve discovered the language you want, click on on the empty checkbox subsequent to it. When you want to set up a number of languages onto your Ubuntu Linux PC, don’t worry! You’ll be able to set up greater than one after the other! Merely undergo and verify as a lot of the packing containers as you want!
Step 6: After choosing the checkboxes subsequent to languages you want to to set up, the language set up is prepared to start. Choose the “Apply” button at the backside of the window to inform Ubuntu to obtain the chosen languages.
Similar to when putting in the language packages, Ubuntu requires that you just enter your person’s password to set up the new languages. In the pop-up field, enter your username. Then, choose the “authenticate” button to proceed on with the set up course of.


When Ubuntu is finished putting in the chosen languages onto your pc, shut the “Language Support” window, as it’s now not wanted.
Step 7: After putting in the language packs, shut the Area & Language window. Then, re-open it. The Area & Language window have to be closed and reopened because it is not going to acknowledge newly downloaded languages with out a restart.
Step 8: Discover the “Language” part and click on on it with the mouse. Upon choosing the “Language” space, you will notice your newly downloaded languages within the menu. Click on on the language to set Ubuntu to it. Then, reboot your PC.


Upon logging again into your Ubuntu PC, it’ll be utilizing the new language! Get pleasure from!


