

In order for you to change the default Excel worksheet direction, you want to undergo this text to study the steps. There are 3 ways to change the default direction of an Excel worksheet – utilizing in-built Settings, Native Group Coverage Editor, and Registry Editor. This text comes with all three strategies, and you’ll observe any one in all them.
In case you open an Excel worksheet, you could find some rows and columns, which characterize Excel. In case you observe extra, you could find A, B, C, D from left to right, which is the standard formation. Nonetheless, if you’d like to change it and present the sheet from right to left as a substitute of left to right due to any motive, right here is how you are able to do that.
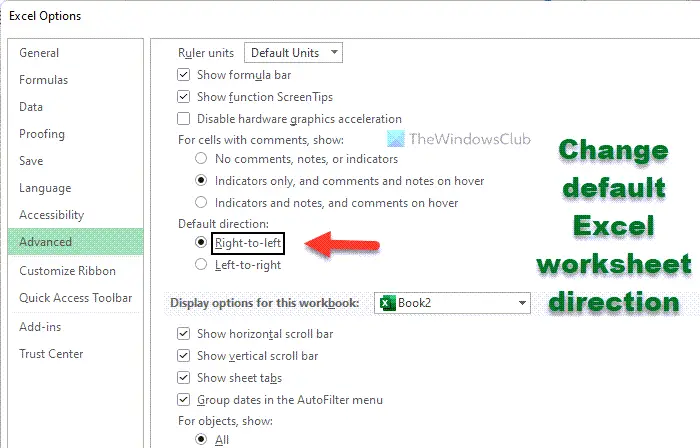
How to change default Excel worksheet direction from right to left
To change the default Excel worksheet direction, observe these steps:
- Open an Excel worksheet in your PC.
- Click on on File and choose Choices.
- Change to the Superior tab.
- Discover the Show part.
- Select Right-to-left possibility.
- Click on the OK button.
To study extra about these steps, proceed studying.
First, you want to open an Excel worksheet in your PC and click on on the File menu seen on the top-left nook. Then, choose the Choices to open the Excel Choices panel.
After that, swap to the Superior tab and discover out the Show part. Right here you could find an possibility known as Default direction. From right here, you want to select the Right-to-left possibility.
Click on the OK button to save the change. Subsequent, you want to open a brand new worksheet to discover the change.
As talked about earlier, you are able to do the identical factor utilizing the Native Group Coverage Editor and the Registry Editor. In order for you to observe the GPEDIT methodology, you need to obtain the executive templates for Workplace.
How to change default Excel worksheet direction utilizing Group Coverage
To change default Excel worksheet direction utilizing Group Coverage, observe these steps:
- Press Win+R to show the Run dialog.
- Kind gpedit.msc and press the Enter button.
- Go to Superior in Consumer Configuration.
- Double-click on the Default sheet direction.
- Select the Enabled possibility.
- Choose the Right-to-left possibility.
- Click on the OK button.
Let’s try these steps intimately.
To get began, you want to open the Native Group Coverage Editor in your pc. For that, press Win+R, kind gpedit.msc, and press the Enter button.
Subsequent, navigate to the next path:
Consumer Configuration > Administrative Templates > Microsoft Excel 2016 > Excel Choices > Superior
Within the Superior folder, you may see a setting known as Default sheet direction. You want to double-click on it and choose the Enabled possibility.


Following that, increase the drop-down menu and choose the Right-to-left possibility.
Click on the OK button to save the change. As soon as achieved, you want to restart Excel to discover the change.
How to change default Excel worksheet direction utilizing Registry
To change default Excel worksheet direction utilizing Registry, observe these steps:
- Seek for registry within the Taskbar search field.
- Click on on the person search end result.
- Click on the Sure button.
- Navigate to workplace in HKCU.
- Right-click on empty area > New > Key.
- Title it as 0.
- Repeat this step to create a sub-key named excel.
- Right-click on excel > New > Keyand identify it as choices.
- Right-click on choices > New > DWORD (32-bit) Worth.
- Set the identify as defaultsheetr2l.
- Double-click on it to set the Worth knowledge as 1.
- Click on the OK button and restart your pc.
Let’s study extra about these steps intimately.
First, seek for registry or registry editor within the Taskbar search field, click on the person search end result, and click on on the OK button to open Registry Editor. Then, navigate to the next path:
HKEY_CURRENT_USERSoftwarePoliciesMicrosoftoffice
Choose the workplace key, right-click on empty area, choose New > Key, and identify it as 16.0.


Then, repeat the identical step to create a sub-key named excel. Following that, do the identical below the excel key to create one other sub-key known as choices.
As soon as the choices key’s made, you want to create a REG_DWORD worth. For that, right-click on choices > New > Key and set the identify as defaultsheetr2l.

Double-click on it to set the Worth knowledge as 1.

Click on the OK button and restart your pc to get the change.
Learn: How to open two Excel information in separate home windows.
How to present Sheet from right to left in Excel?
To point out sheets from right to left in Excel, you want to observe the above-mentioned guides. You’ll be able to open the Excel Choices panel and swap to the Superior tab. Then, discover the Show part, and discover the Default direction menu. Select the Right-to-left possibility and click on the OK button to save the change.
How to change show direction in Excel?
To change the show direction in Excel, you should use the in-built settings, GPEDIT and REGEDIT. Within the Group Coverage, navigate to Microsoft Excel 2016 > Excel Choices > Superior in Consumer Configuration. Then, double-click on the Default sheet direction setting and select the Enabled possibility. After that, choose the Right-to-left possibility and click on the OK button.
That’s all! Hope this information was helpful.


