

On this submit, we are going to see how one can add, take away or modify Trusted Locations in order that information in these areas won’t be checked. We may even present you’ll present you how you can allow or disable Trusted Locations in Microsoft Office apps like Phrase, Excel, PowerPoint, and many others. utilizing Group Coverage or Registry Editor.
Microsoft Office consists of Belief Heart, which accommodates safety & privateness settings, to maintain your Home windows laptop safe & secure. Utilizing the File Block characteristic, you’ll be able to stop outdated file sorts or suspicious information from opening, and open them in Protected View.
There could also be instances the place you belief some information – particularly these with macros, knowledge connections, ActiveX controls – fully and don’t want them to be checked by Belief Heart, each time you open them – or you might not need them opened in Protected View. In such instances, moderately than altering the default Belief Heart settings to a less-safe macro safety setting, it’s higher to maneuver such information to a Trusted Location.
Trusted Locations in Office
If you do not need Office information to be checked by Belief Heart or opened in Protected View, add them to Trusted Locations. You may add trusted areas, in any Microsoft Office doc like Entry, Excel, Visio, Phrase and PowerPoint, by following this process.
- Open any Office doc – say Phrase
- Click on on File > Choices.
- Subsequent click on Belief Heart
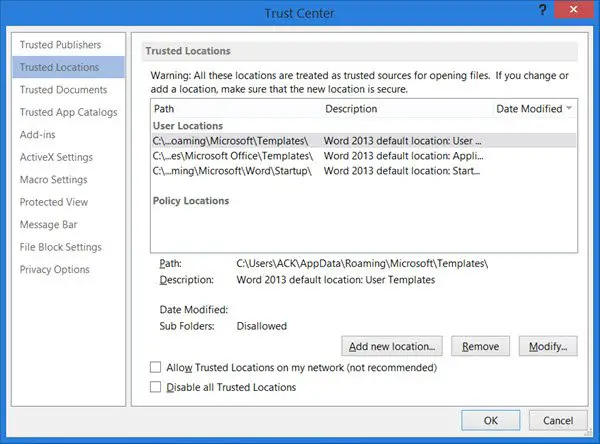
- Go to Belief Heart Settings > Trusted Locations.
- Right here you will note buttons that allow you to Add new location, Take away it or Modify them.
- So as to add a brand new location, click on Add a trusted location, click on Browse, choose the folder and click on OK.
- To take away a trusted location, choose the situation to be eliminated, click on Take away button after which click on OK.
- To modify it, click on on the Modify button, and make the modifications. Lastly click on OK and exit.
You even have choices to permit Trusted Locations in your networks or disable all Trusted Locations, by checking the packing containers.
How one can allow or disable Trusted Locations in Microsoft Office
Now we have seen how you can add, take away or modify Trusted Locations in Microsoft Office apps. Nevertheless, if you do not need to make use of this performance in any respect, you’ll be able to disable it in your laptop. In your data, it’s doable to allow or disable Trusted Locations in Microsoft Office apps utilizing in-built settings or the Choices panel, Native Group Coverage Editor, and the Registry Editor.
Right here, we’ve got proven the steps for Microsoft Excel. Nevertheless, you are able to do the identical in Phrase and PowerPoint as effectively. To allow or disable Trusted Locations in Microsoft Office, observe these steps:
- Open Microsoft Excel in your laptop.
- Click on on the Choices.
- Go to Belief Heart > Belief Heart Settings > Trusted Locations.
- Tick the Disable all Trusted Locations checkbox.
- Click on the OK button.
To be taught extra about these steps, proceed studying.
First, you must open Microsoft Excel or another Microsoft Office app and click on on the Choices menu.
Then, go to the Belief Heart tab, click on on the Belief Heart Settings button, and change to the Trusted Locations tab.


Then, tick the Disable all Trusted Locations checkbox and click on the OK button.
Word: If you wish to revert to the unique setting, you must open the identical setting in the Native Group Coverage Editor and select the Not Configured choice.
How one can allow or disable Trusted Locations in Microsoft Office utilizing Group Coverage
To allow or disable Trusted Locations in Microsoft Office utilizing Group Coverage, observe these steps:
- Press Win+R > kind gpedit.msc > press the OK button.
- Navigate to Trusted Locations in Person Configuration.
- Double-click on the Disable all trusted areas setting.
- Select the Enabled choice.
- Click on the OK button.
Let’s discover out extra about these steps.
To get began, open the Native Group Coverage Editor by urgent Win+R > typing gpedit.msc and urgent the OK button. Then, navigate to this path:
Phrase:
Person Configuration > Administrative Templates > Microsoft Phrase 2016 > Phrase Choices > Safety > Belief Heart > Trusted Locations
Excel:
Person Configuration > Administrative Templates > Microsoft Excel 2016 > Excel Choices > Safety > Belief Heart > Trusted Locations
PowerPoint:
Person Configuration > Administrative Templates > Microsoft PowerPoint 2016 > PowerPoint Choices > Safety > Belief Heart > Trusted Locations
Double-click on the Disable all trusted areas setting and select the Enabled choice.


Then, click on the OK button to avoid wasting the change.
How one can allow or disable Trusted Locations in Microsoft Office utilizing Registry
To allow or disable Trusted Locations in Microsoft Office utilizing Registry, observe these steps:
- Press Win+R > kind regedit > hit the Enter button.
- Click on on the Sure button.
- Go to workplace > 16.0 > excel/phrase/powerpoint in HKCU.
- Proper-click on excel/phrase/powerpoint > New > Key and title it as safety.
- Proper-click on safety > New > Key and title it as trusted areas.
- Proper-click on trusted areas > New > DWORD (32-bit) Worth.
- Set the title as alllocationsdisabled.
- Double-click on it to set the Worth knowledge as 1.
- Click on the OK button and restart your PC.
Let’s take a look at extra about these steps.
First, press Win+R > kind regedit > press the Enter button and click on the Sure button to open the Registry Editor in your laptop. Then, navigate to this path:
HKEY_CURRENT_USERSoftwarePoliciesMicrosoftoffice16.0excel
Proper-click on excel > New > Key and title it as safety. Then, right-click on safety > New > Key and title it as trusted areas.


Following that, right-click on trusted areas > New > DWORD (32-bit) Worth. It’s worthwhile to title it as alllocationsdisabled.

As you wish to disable the Trusted Locations characteristic, you must double-click on it and set the Worth knowledge as 1.

Lastly, click on the OK button, shut all home windows, and restart your laptop.
Word: If you’re unable to navigate to the talked about path, you must create it manually. Secondly, if you wish to set the default settings, you must delete the alllocationsisabled REG_DWORD worth. For that, right-click on it, select the Delete choice, and click on the OK button.
How do I alter my trusted location?
To vary the trusted location in Office 365, you must open the Choices panel first. Then, change to the Belief Heart tab on the left facet and click on on the Belief Heart Settings button. After that, go to the Trusted Locations and click on the Add new location button. Now, you’ll be able to select the brand new trusted location and click on the OK button.
How do I add a trusted location in Excel?
So as to add a trusted location in Excel, open the app and click on the Choices first. Then, go to the Belief Heart tab and click on the Belief Heart Settings button. Following that, change to the trusted Locations tab and click on the Add new location button. Select a location and save the modifications by clicking the OK button.
Earlier than you add any location, be sure that the brand new location is totally safe.


